Install zPDT Emulator
ZD&T is based on the zPDT tool (IBM z Systems Personal Development Tool). The zPDT emulator is the software that emulates the Mainframe.
The zPDT Redbook. It explains how to use the emulator:
It’s necessary to have the license server installed. It’s needed to be able to run the emulator and also to decrypt the *RES1.ZPD disks that come with ADCD distributions.
This emulator cannot be installed on the same machine as the web administration tool or the license server.
Installing only the emulator is for those users who don’t want to have the web tool. For example, they only want to have a system with an emulator installed. This option is “faster”, but it’s harder to manage.
NOTE Before starting the installation, you need to make sure you have space to store the system disks. About 300GB for the ADCD z/OS 2.4 November 2019 version. In addition to having space for our user disks.
To perform the installation, follow these steps:
https://www.ibm.com/docs/en/zdt/12.0.5?topic=edition-installing-zdt-emulator
Prerequisites and Installation
Before starting, we must meet these requirements (commands to install them on Ubuntu):
apt-get -y install iptables
dpkg --add-architecture i386
apt-get -y update
apt-get -y install libc6:i386 libncurses5:i386 libstdc++6:i386 lib32z1 lib32stdc++6
apt-get -y install ftp
apt-get -y install perl
apt-get -y install zip
apt-get -y install unzip
apt-get -y install gzip
apt-get -y install bc
apt-get -y install libasound2
apt-get -f install
We copy the installation package to this machine. In my case, it’s called ZDT_Install_EE_V12.0.5.0.tgz
We open a terminal and go to the path where we copied it. We change the permissions to 775:
chmod 755 ZDT_Install_EE_V12.0.5.0.tgzWe decompress the file with the command:
tar -xzvf ZDT_Install_EE_V12.0.5.0.tgzWe run the program to perform the installation:
./ZDT_Install_EE_V12.0.5.0.x86_64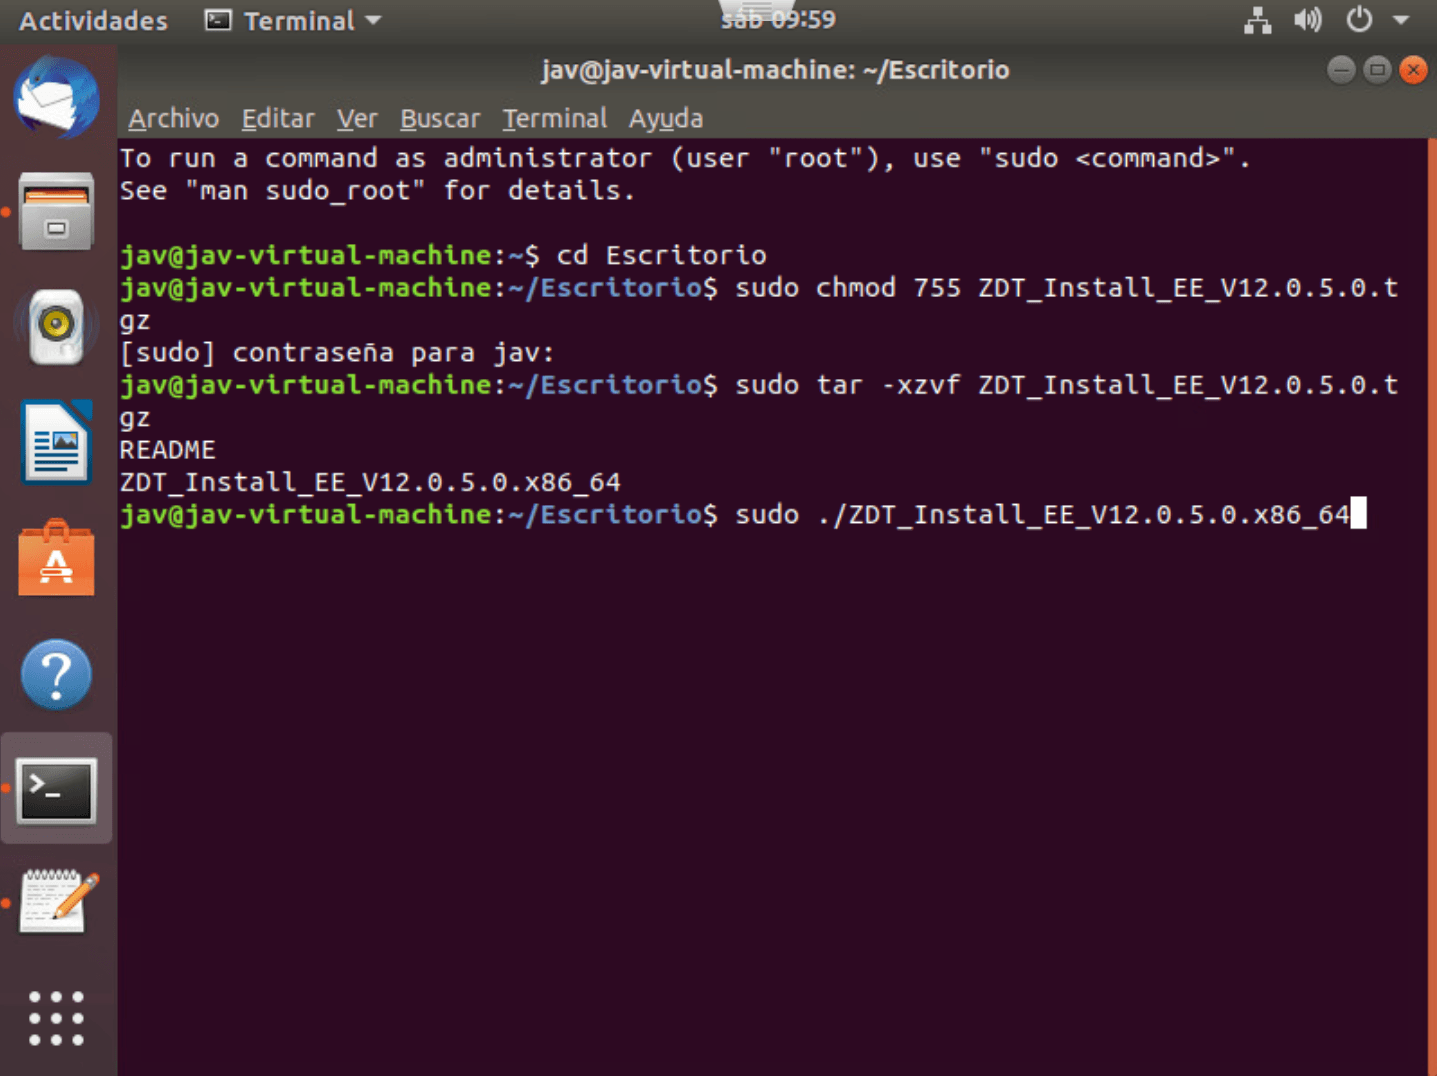
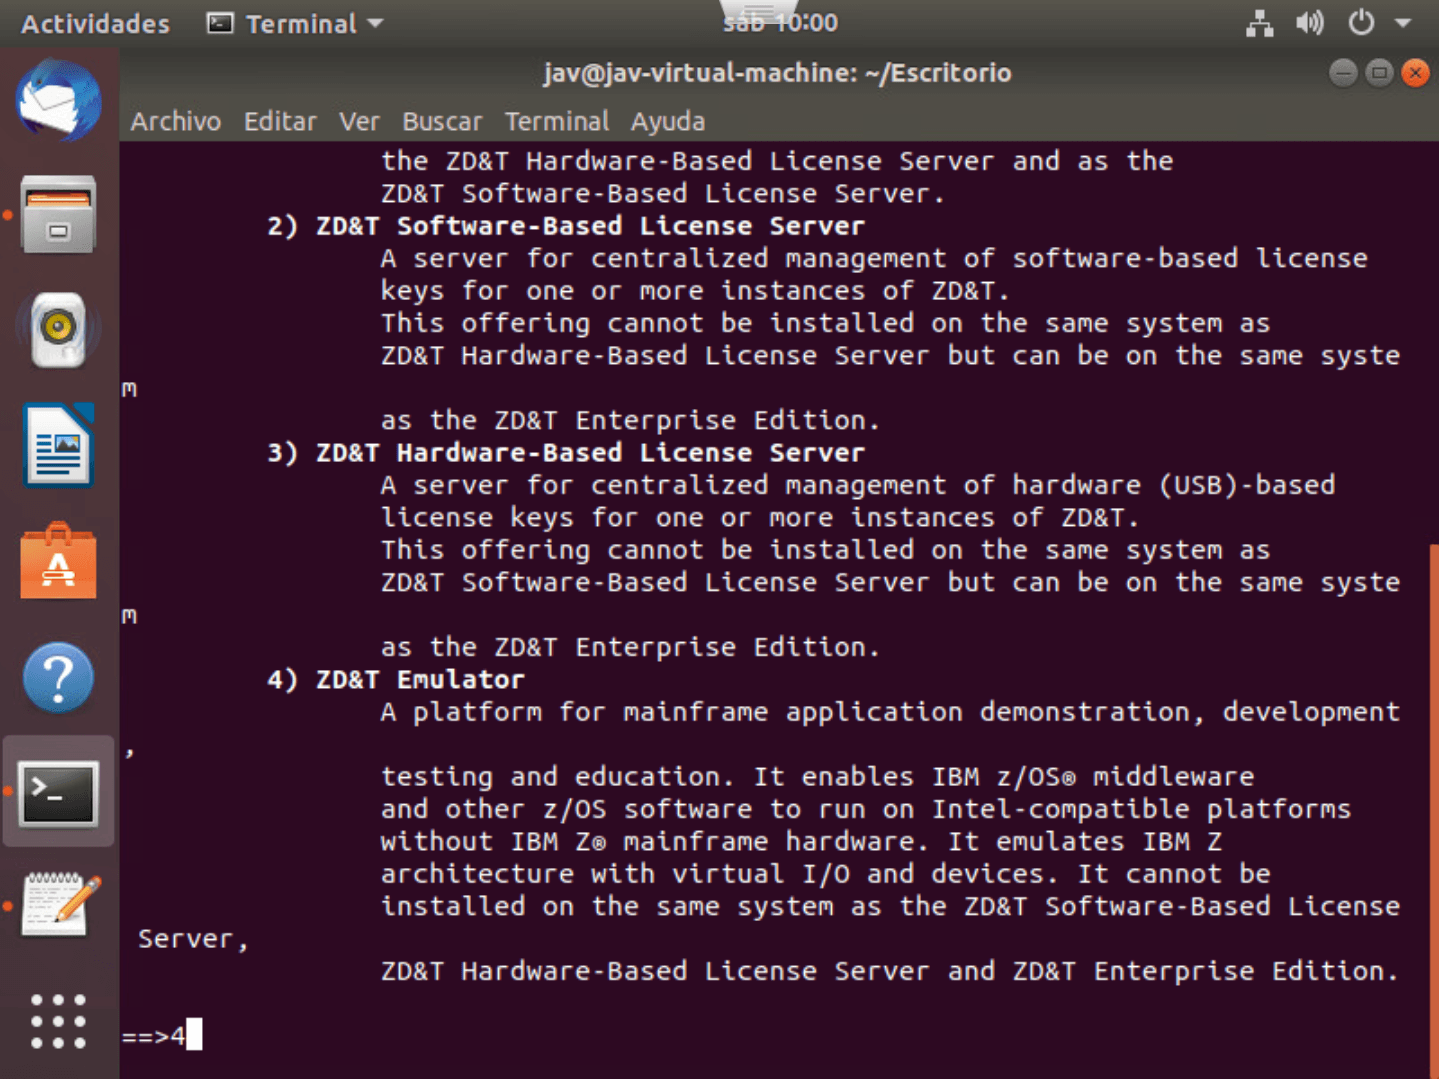
The different installation options will appear. In this case, we choose option 4 to install the emulator.
We choose option 1 - Install.

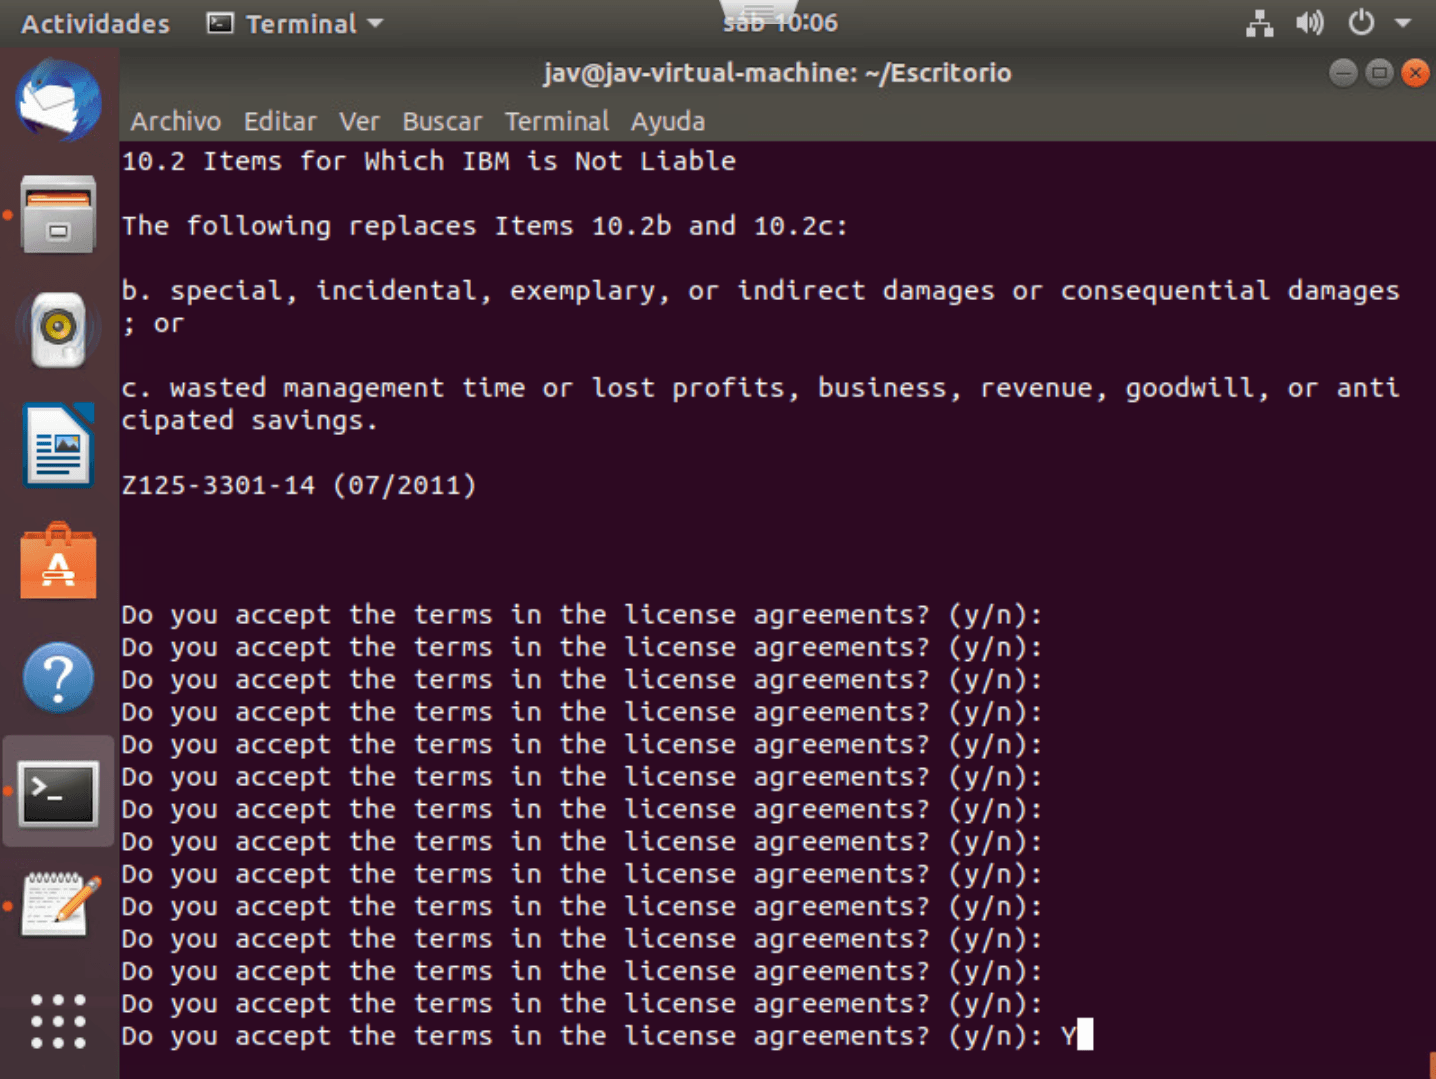
After pressing enter (for a while…), if we agree with the license, we accept.
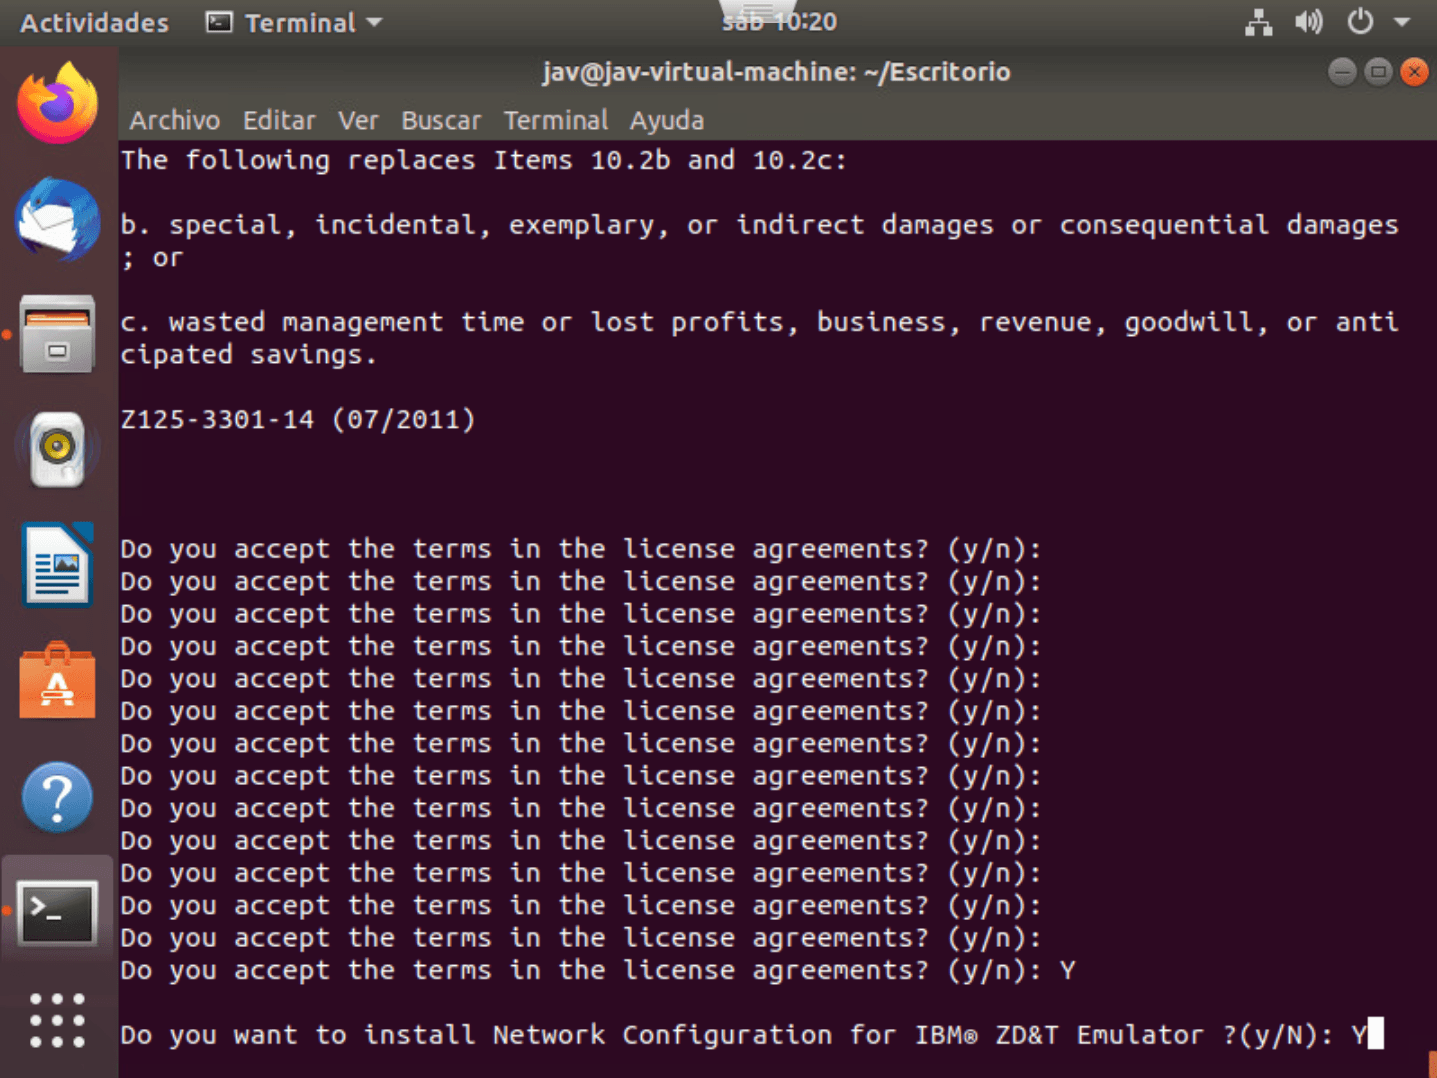
This option is for sharing the IP of the Linux system (in this case, Ubuntu) with z/OS. This way it’s not necessary to give a new static IP to z/OS to be able to interact directly with the z/OS system.
To answer one thing or another, you will have to consider your configuration since if you do the automatic configuration, it will make changes to the Linux system, the Linux firewall, and the z/OS TCPIP definition.
In my case, I will press Y, to test how it works.
We can also decide if we want the dependencies installed automatically. The system must be able to access the internet.

We wait a bit and the emulator will be installed. With the installation, the ibmsys1 user is created. We must change the password for this user using the command:
passwd ibmsys1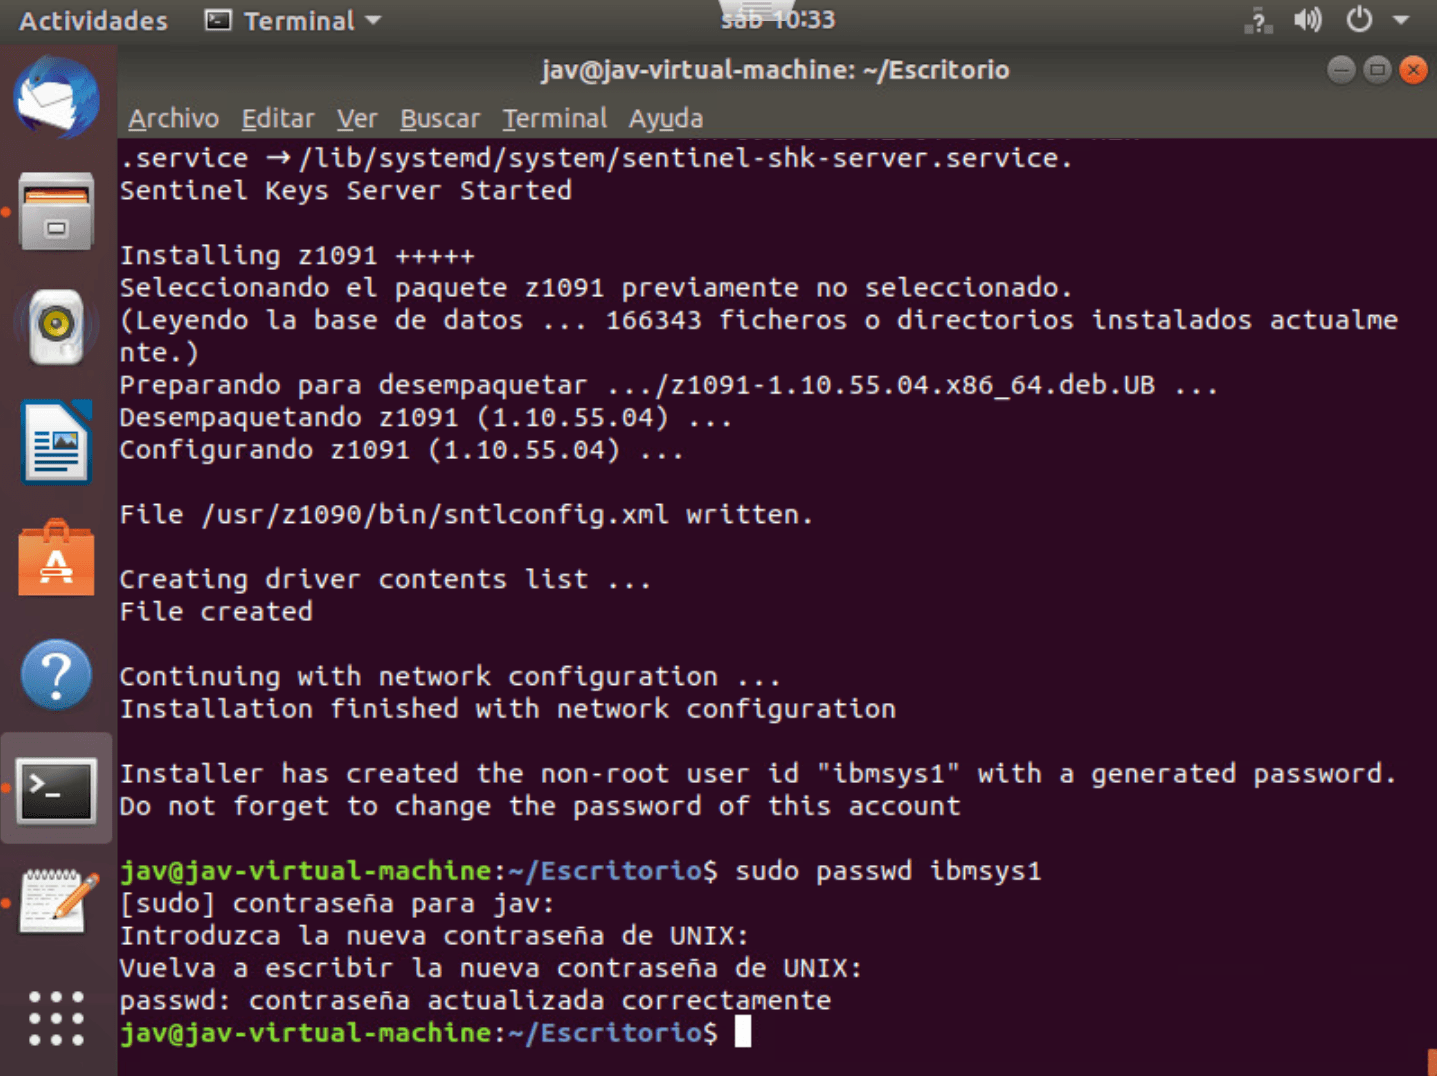
If we want to confirm it’s properly installed, we can use the command:
dpkg -l | grep z1091
Connect to License Server
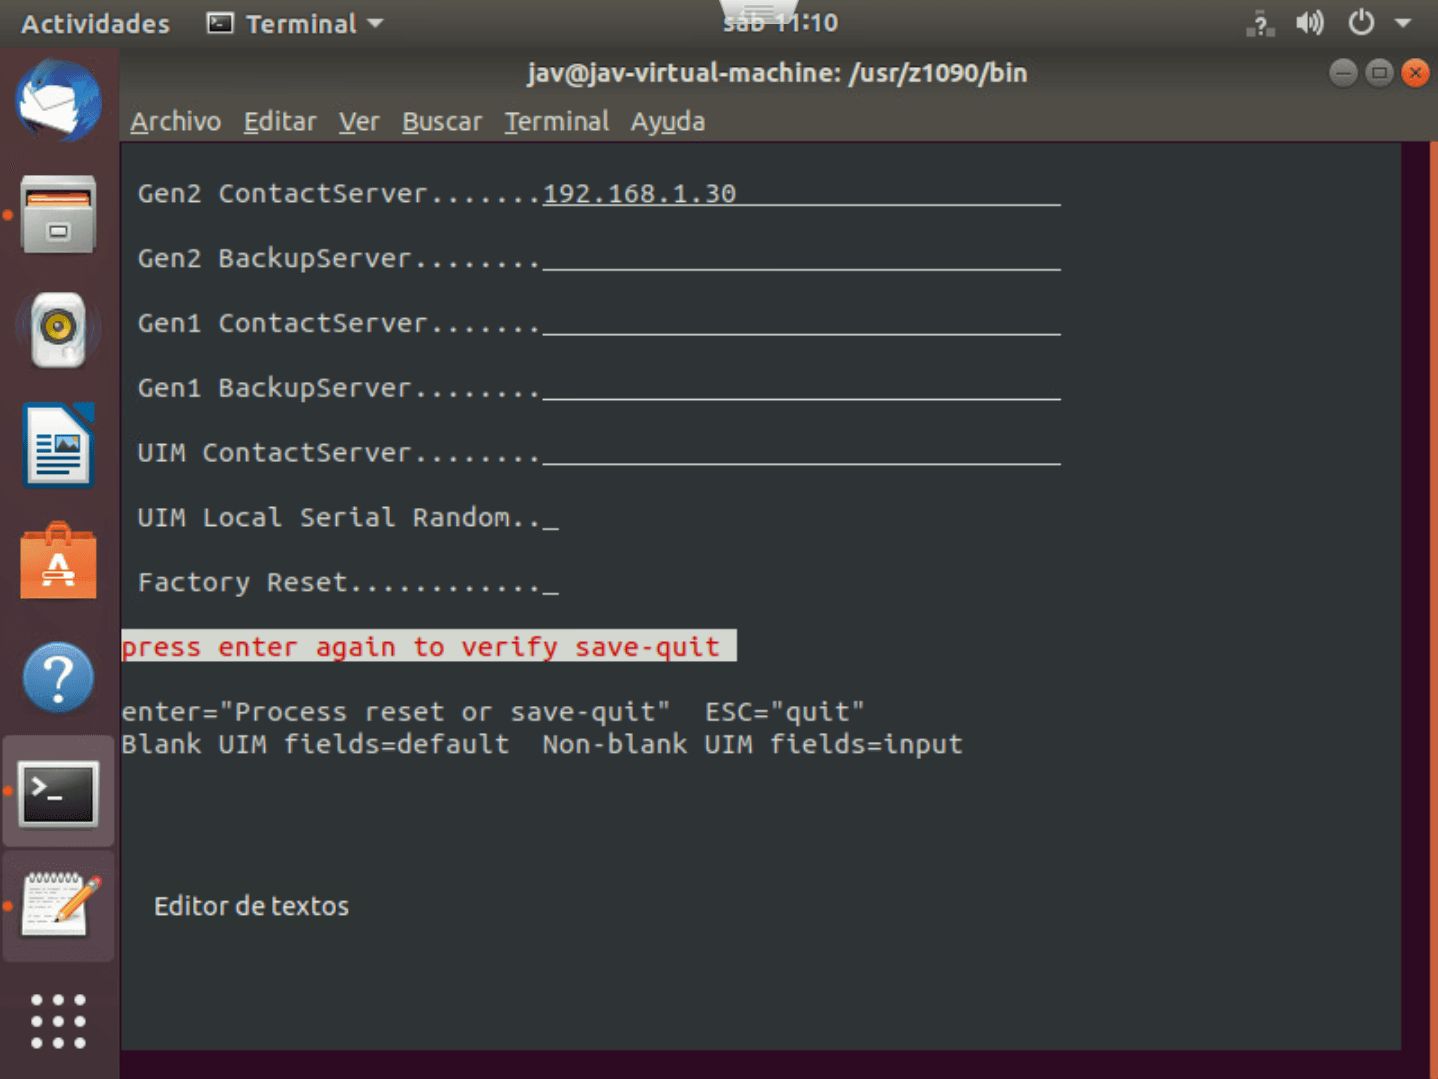
Now we’re going to change the configuration to indicate our license server that we installed in the previous entry. To do this we go to the path /usr/z1090/bin and execute the command:
./clientconfig
Since the license server is software-based, I will put the IP of the system where I installed the license server.
Once done (and with the license server running), we use the following command to verify it works:
NOTE When I did it the first time, it didn’t connect to the license server because I added the license later. By restarting the system where I’m installing the zPDT emulator, it was solved and showed the license information.
./query_license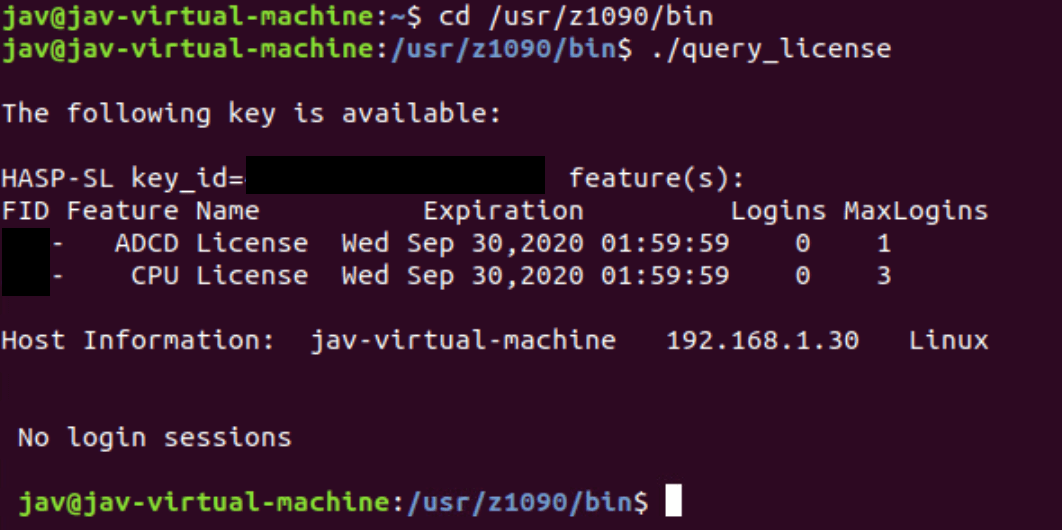
Create System Instance
Now we’re going to create the instance (that is, the configuration of disks and other resources that we will start) of the emulator. To do this, the first thing is to have the system disks that we will start. In my case, the version I will use is ADCD z/OS 2.4 November 2019 Edition.
We log in with the ibmsys1 user and save the disks in the path /home/ibmsys1/volumes
The *RES1.ZPD disks will need to be decrypted.
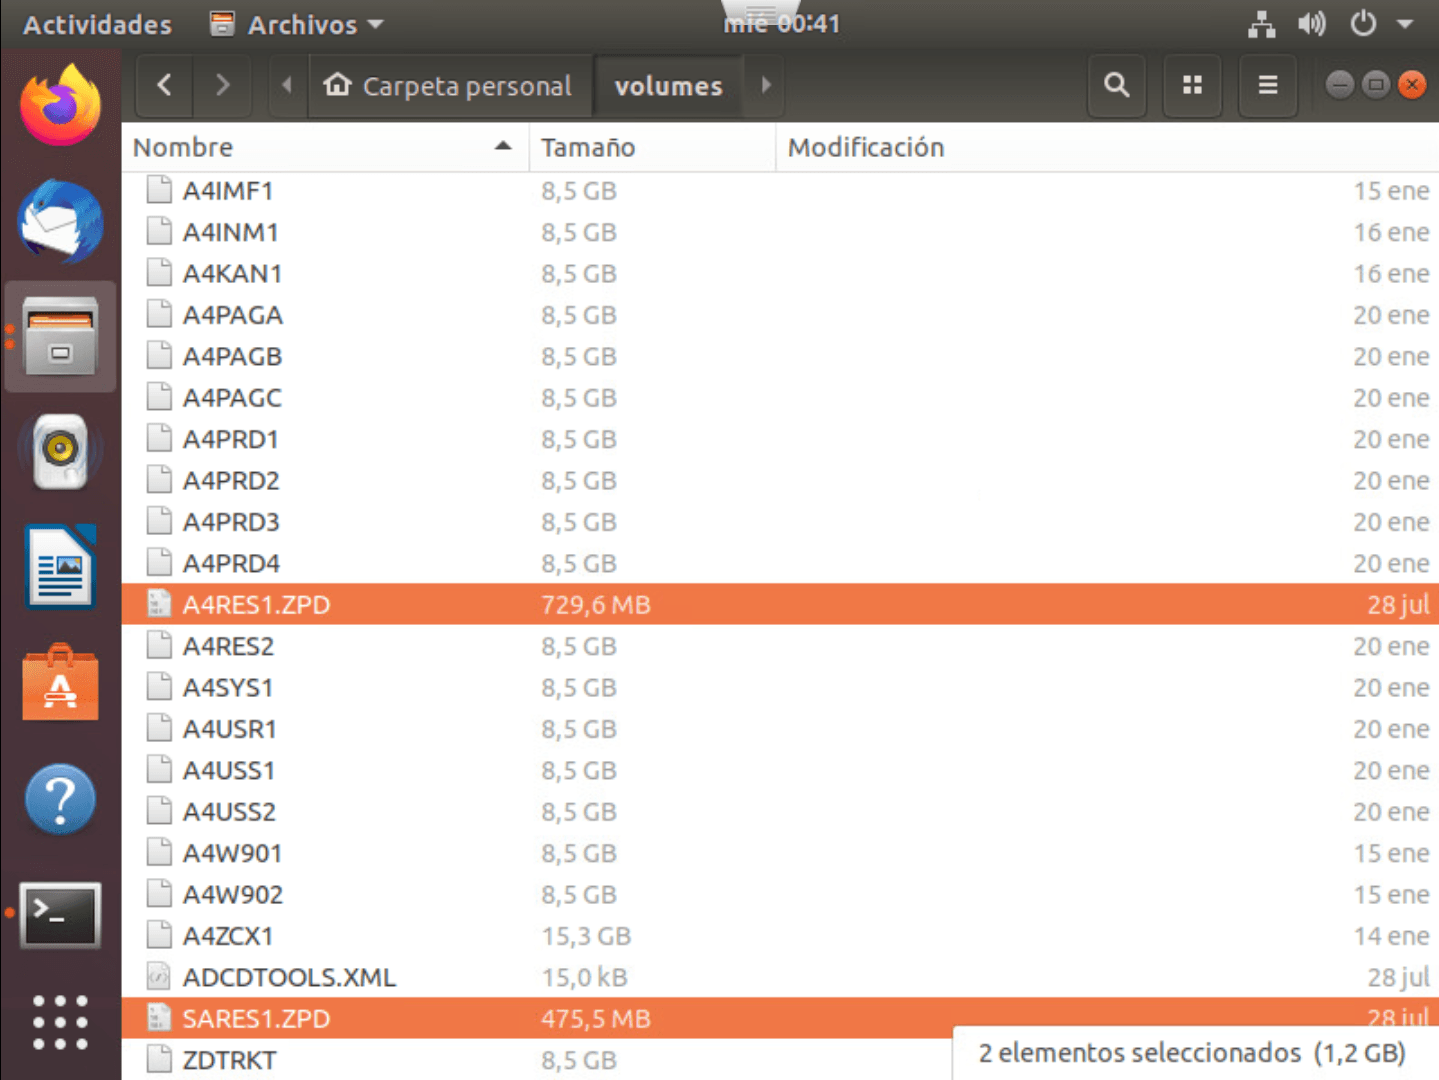
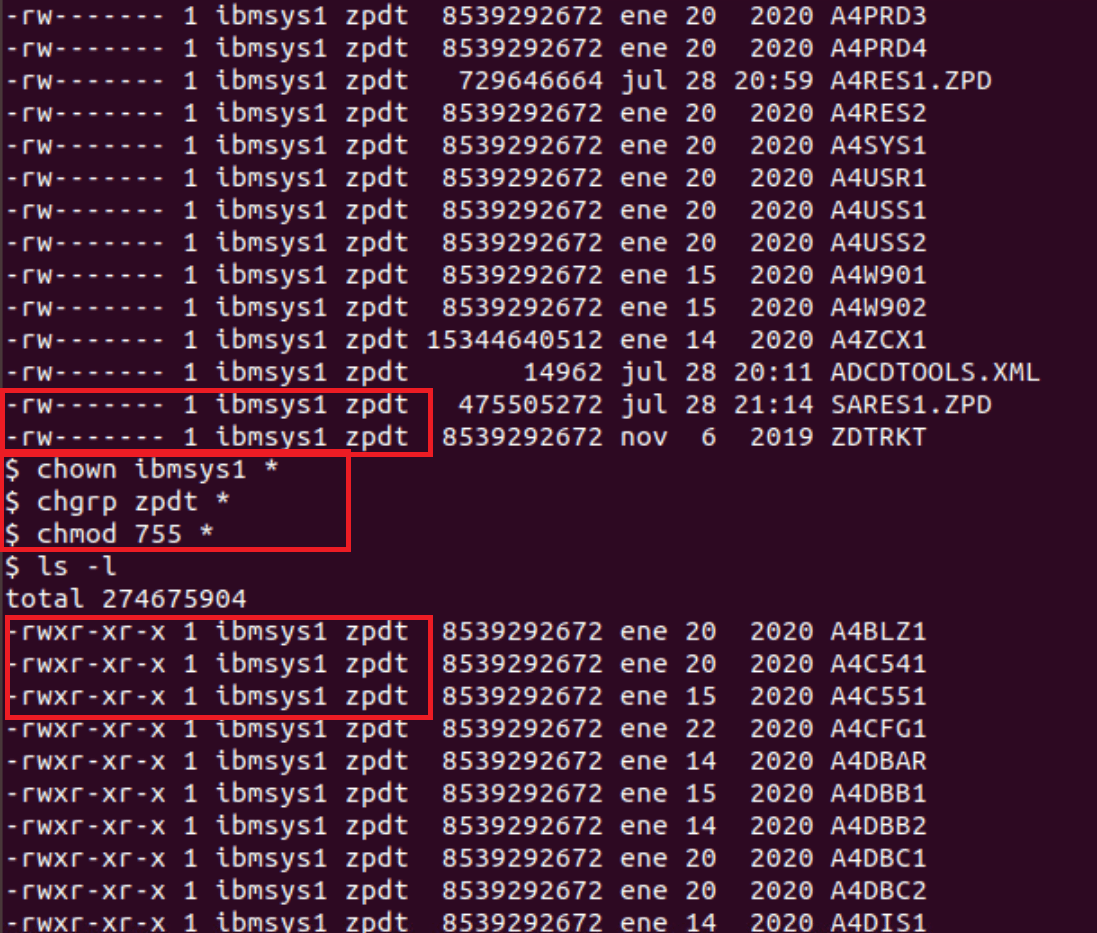
Now we need to make sure that the owner of all volumes is a user other than root (for example, ibmsys1). In addition to giving “755” permissions.
chown ibmsys1 *
chgrp zpdt *
chmod 755 *
In my case, the owner and group were fine, but the permissions were not. The differences can be seen in the image.
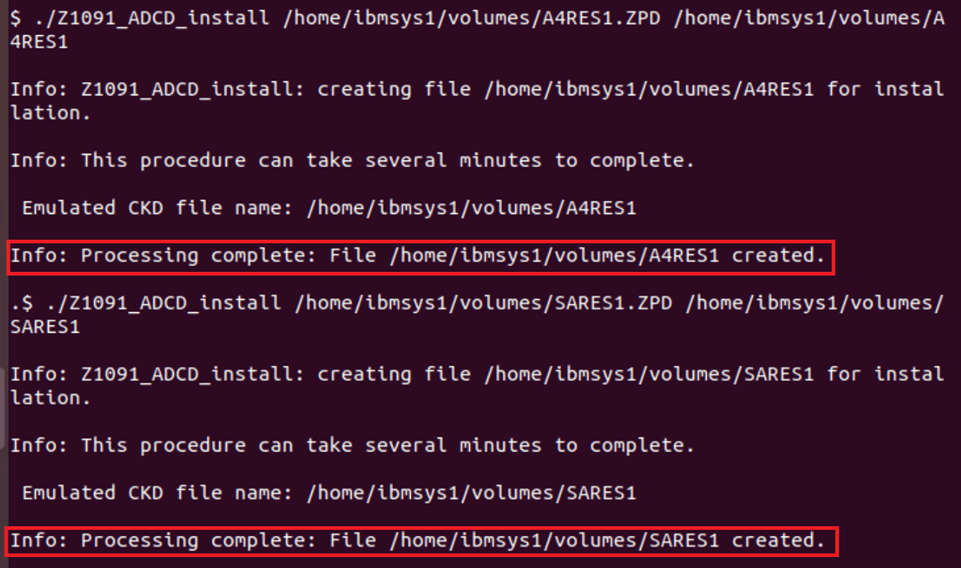
To decrypt the *RES1.ZPD volumes we will use the following commands:
cd /usr/z1090/bin
./Z1091_ADCD_install input_file output_file
For example:
./Z1091_ADCD_install /home/ibmsys1/volumes/A4RES1.ZPD /home/ibmsys1/volumes/A4RES1
./Z1091_ADCD_install /home/ibmsys1/volumes/SARES1.ZPD /home/ibmsys1/volumes/SARES1
Error When Decrypting ZPD Disks
When executing the command, the following error appeared:
error while loading shared libraries: libawsDiskItf.soApparently, this can be due to not using a user that is NOT root (ibmsys1), but I was using that user…
I even created the ibmsys2 user, who was also not root, but the error was the same. I verified that this library existed in /usr/z1090/bin

At this point, I was a bit lost (I even reinstalled Ubuntu and it didn’t work).
I tried another program (the one that starts the emulator, awsstart) and saw that it also gave an error loading a different library, which was also in /usr/z1090/bin
This made me think that the problem was in some environment variable that was not properly defined.
When checking the hidden “.bashrc” file inside /home/ibmsys1, I saw that it tries to define some variables, but there must be some error in the file and it doesn’t do it.
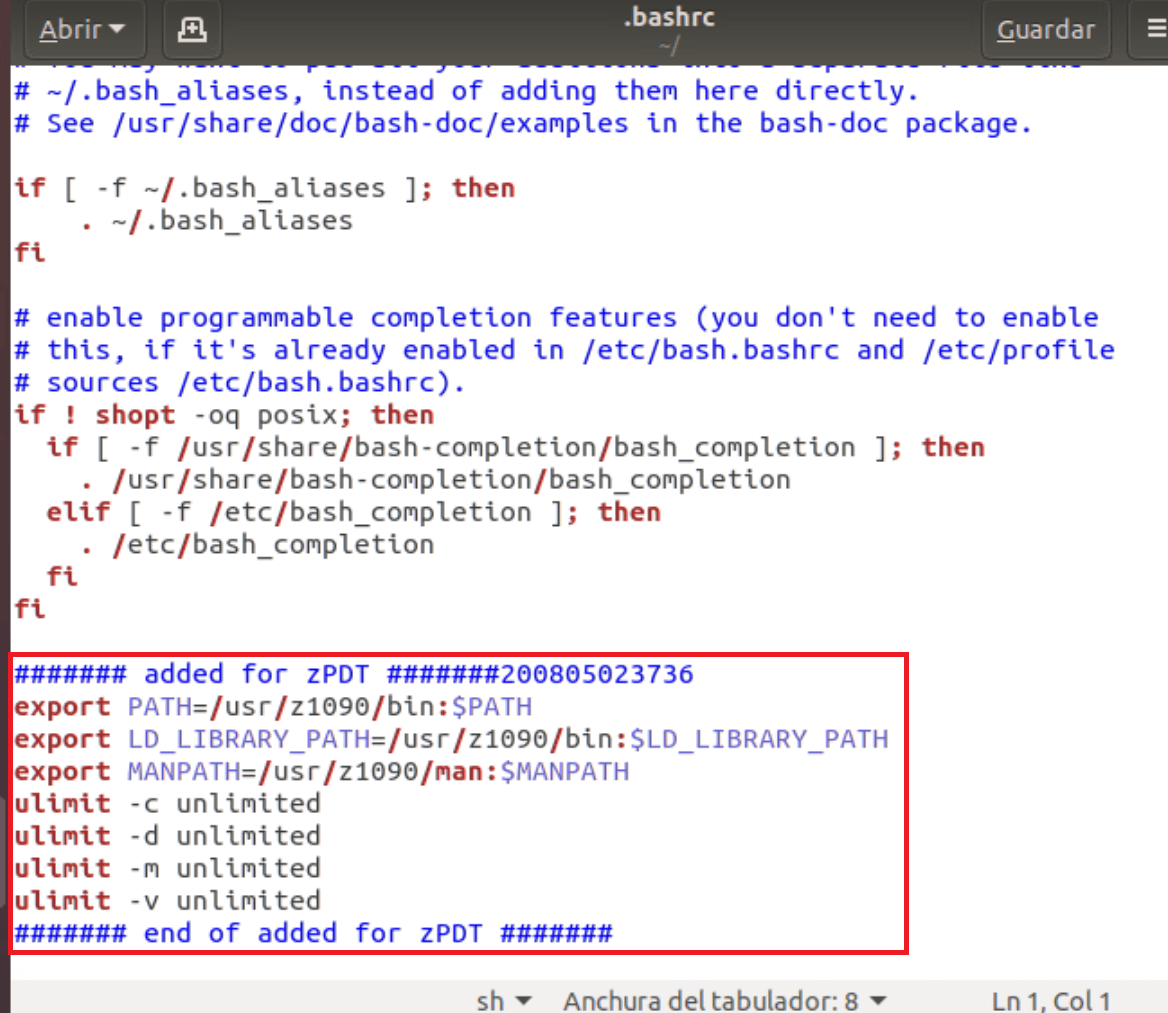
When giving those commands manually in a terminal with the “ibmsys1” user, everything started working.
export PATH=/usr/z1090/bin:$PATH
export LD_LIBRARY_PATH=/usr/z1090/bin:$LD_LIBRARY_PATH
export MANPATH=/usr/z1090/man:$MANPATH
ulimit -c unlimited
ulimit -d unlimited
ulimit -m unlimited
ulimit -v unlimited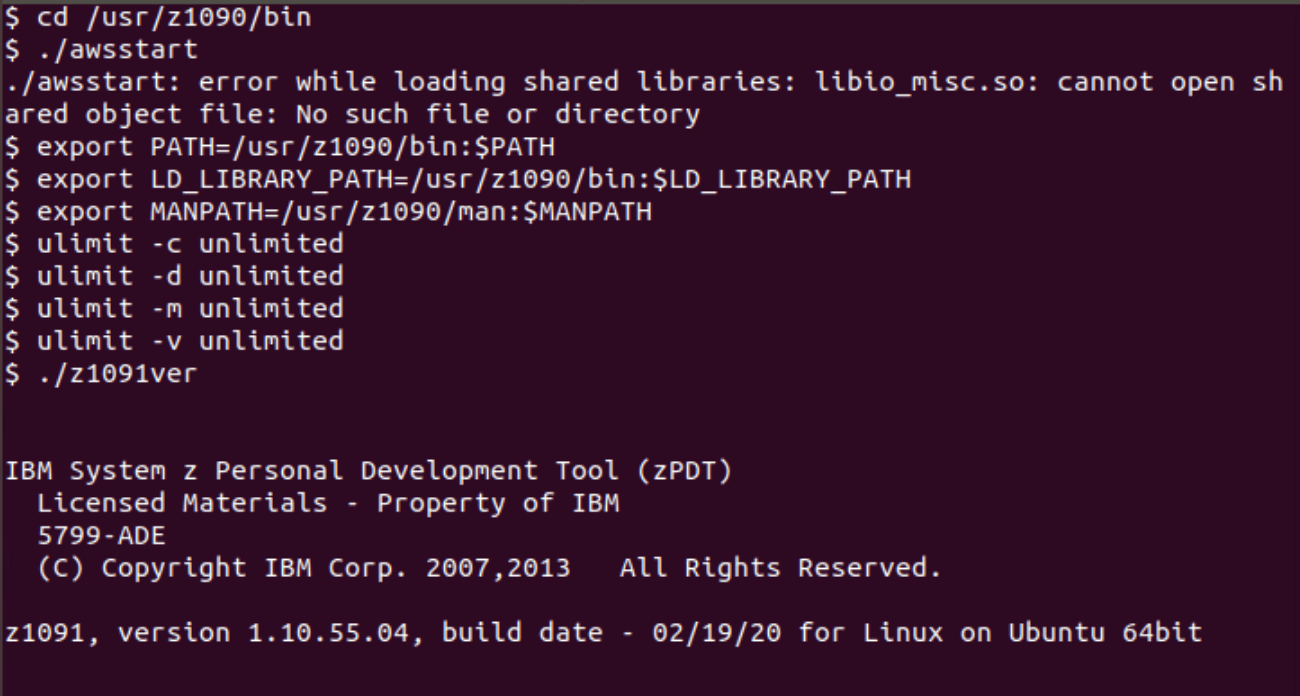
Although this worked, the problem still existed, because when restarting the commands had to be given again. Investigating a bit more, this happens because when the user is created, the “shell” assigned to it is /bin/sh, instead of /bin/bash. You can check with the command getent passwd and look for the user.

We can change it with the command:
chsh -s /bin/bash ibmsys1

With this changed, it’s now possible to restart the system and it will work correctly.
After this, I was able to extract the disks correctly.
Now that we have all the volumes ready to use, we’re going to create the “devmap”. It can be done manually, but there’s a script that does it directly. To execute it:
cd /opt/ConfigGuideSample
perl create_devmap.pl volumes_path > generateddevmap
For example:
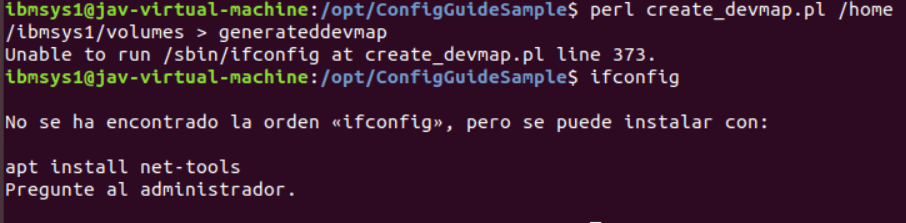
perl create_devmap.pl /home/ibmsys1/volumes > generateddevmapIn my case, it failed because the “net-tools” package was missing. After installing it (apt-get install net-tools), it worked correctly.
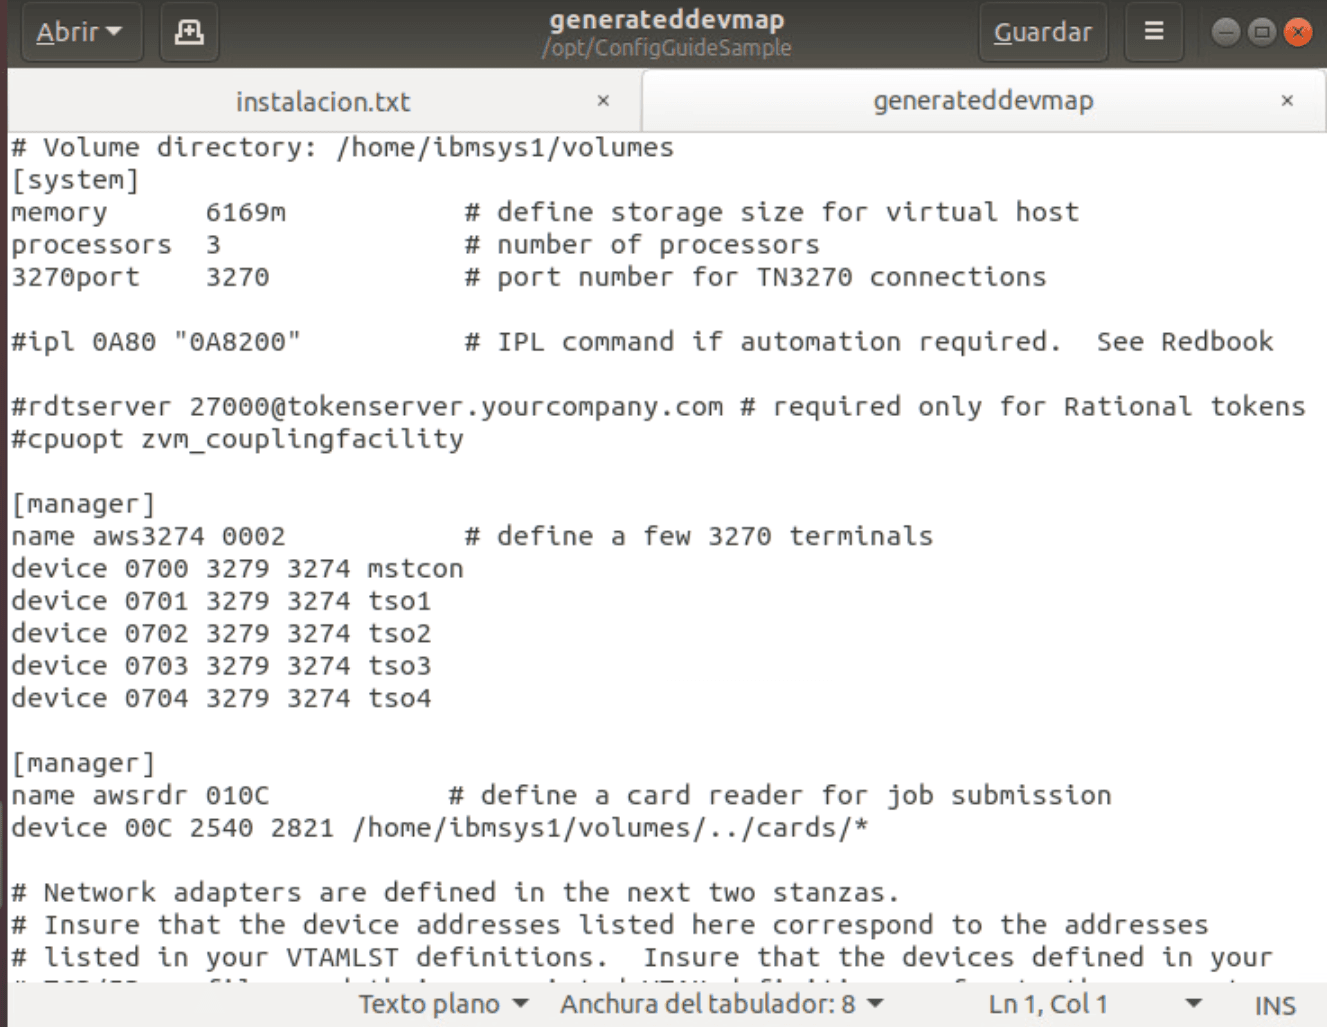
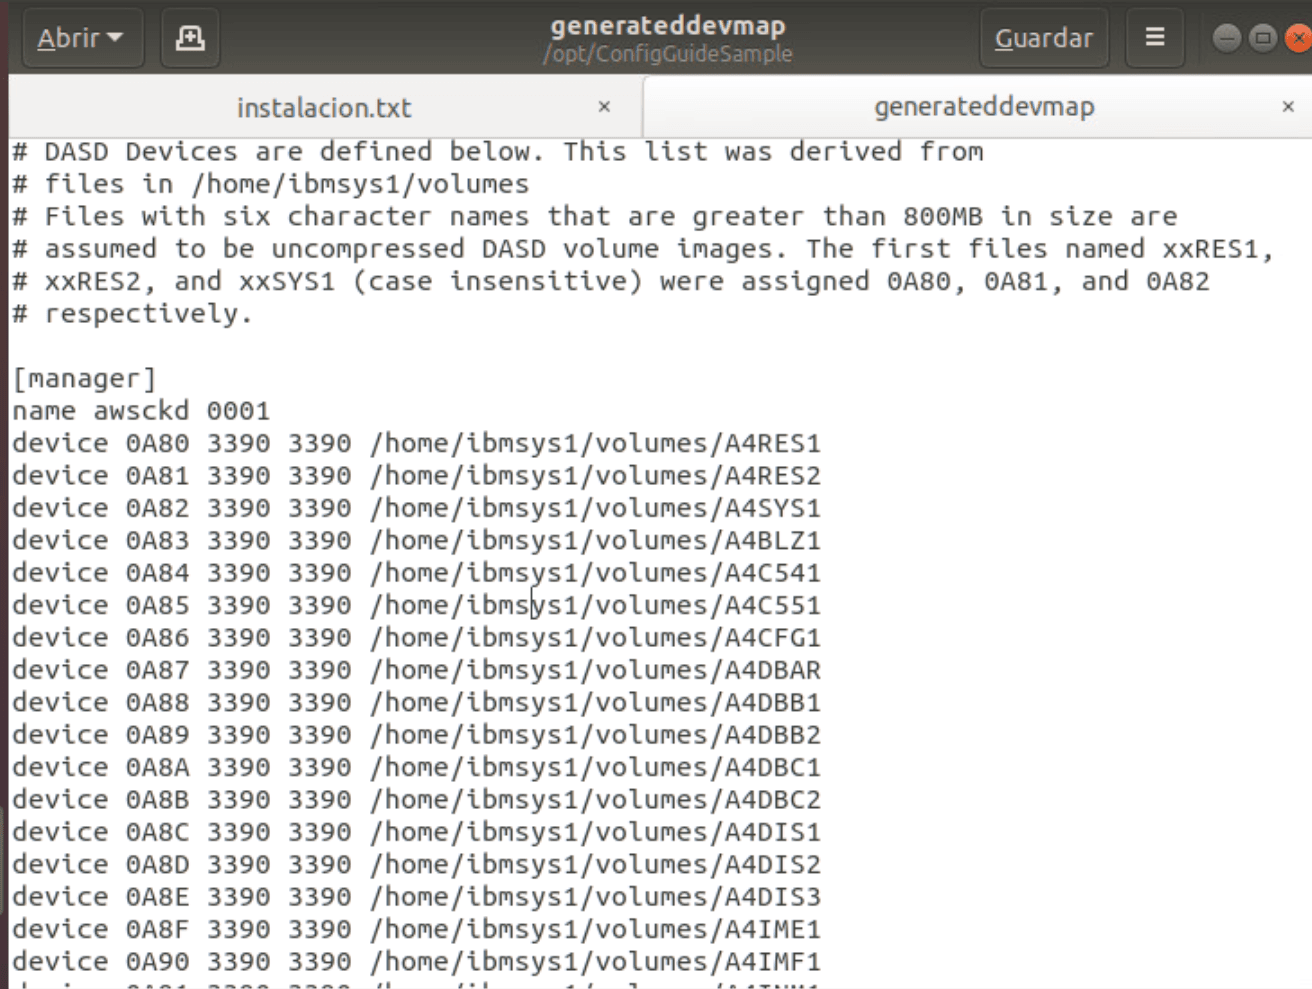
The result is:
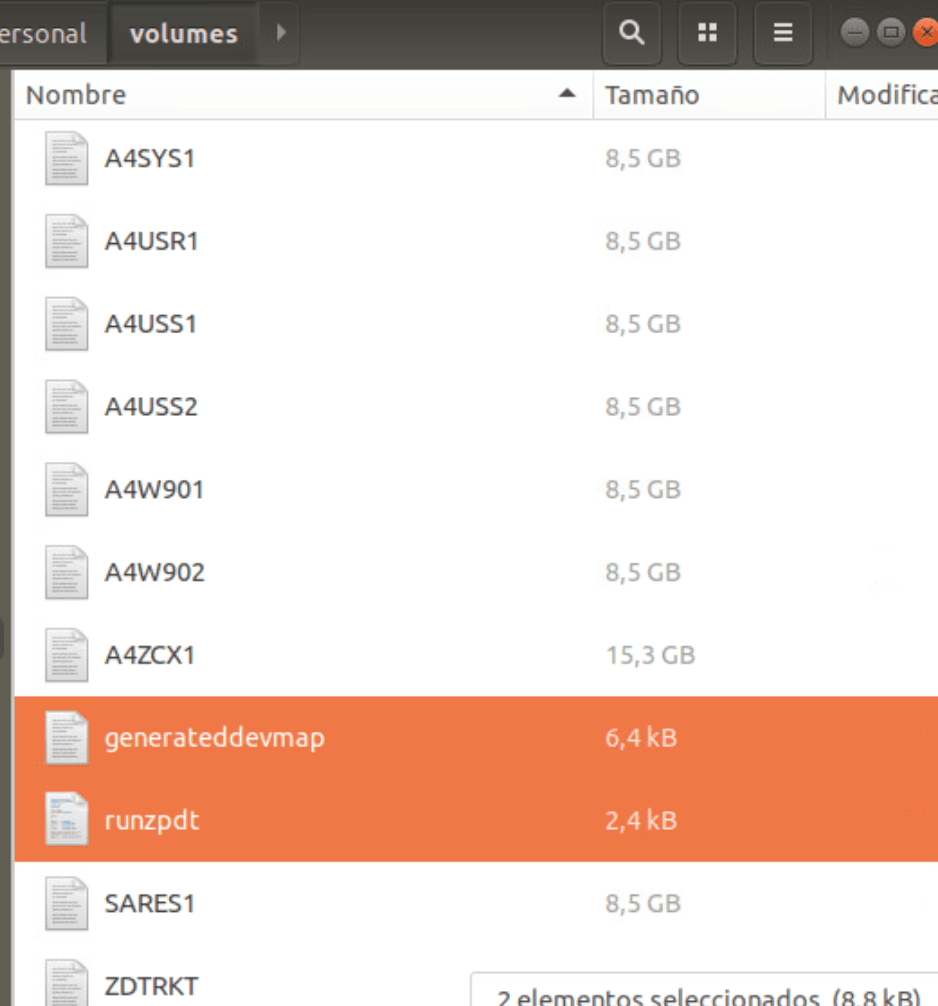
Now we will copy the generateddevmap and runzpdt files from the /opt/ConfigGuideSample directory to the directory where we have the volumes (/home/ibmsys1/volumes).
Start Emulator
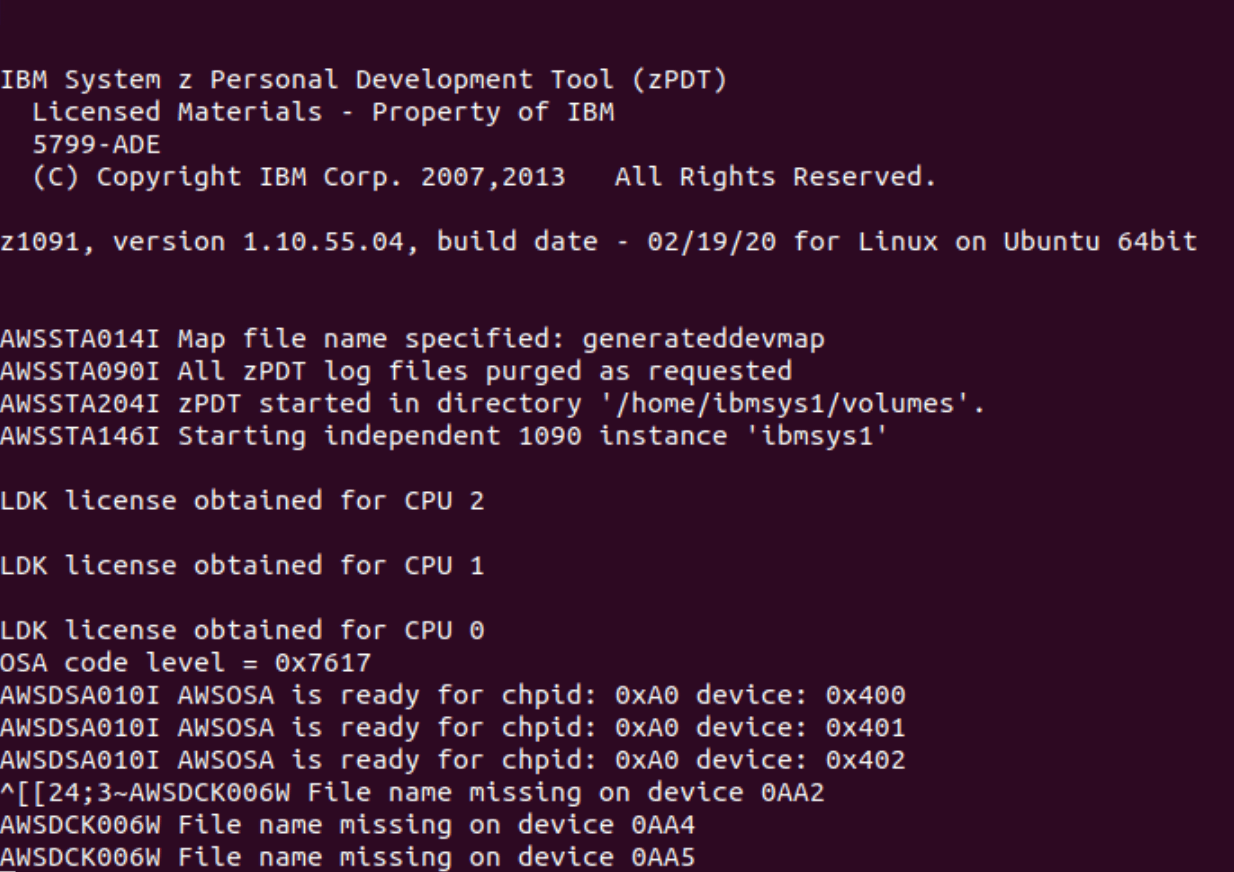
We start the emulator with the command:
./runzpdt -d <devmap name> -l <loadparm option>For example:
./runzpdt -d generateddevmap -l cs
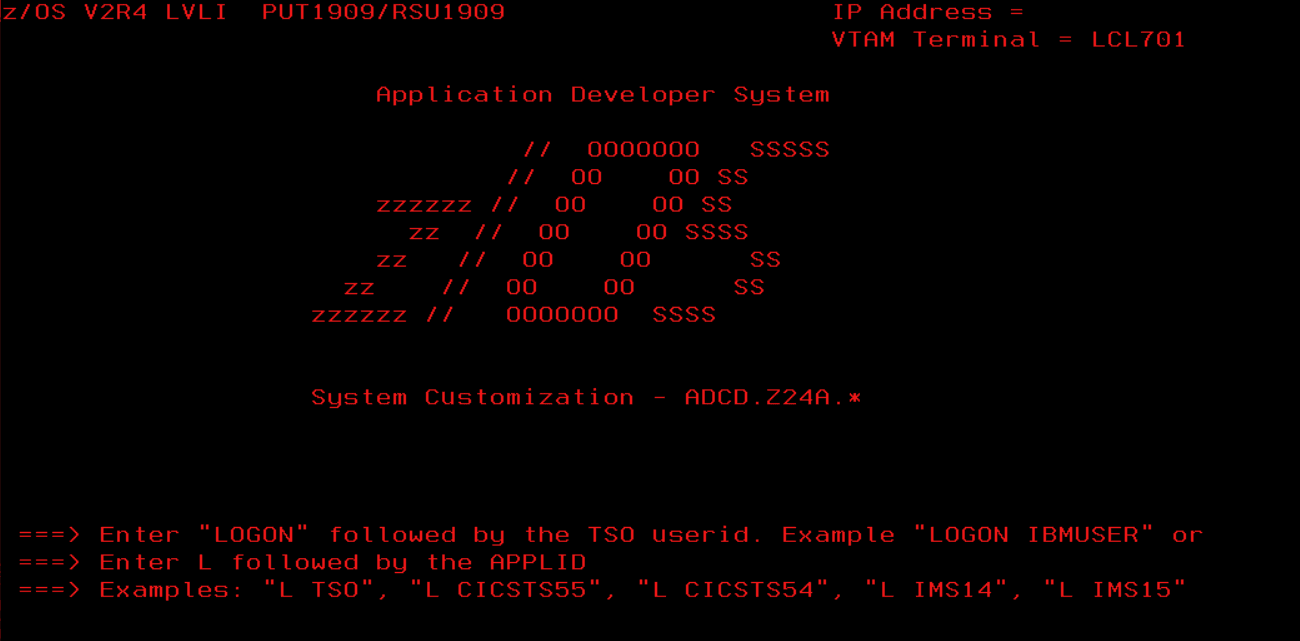
It will start booting:
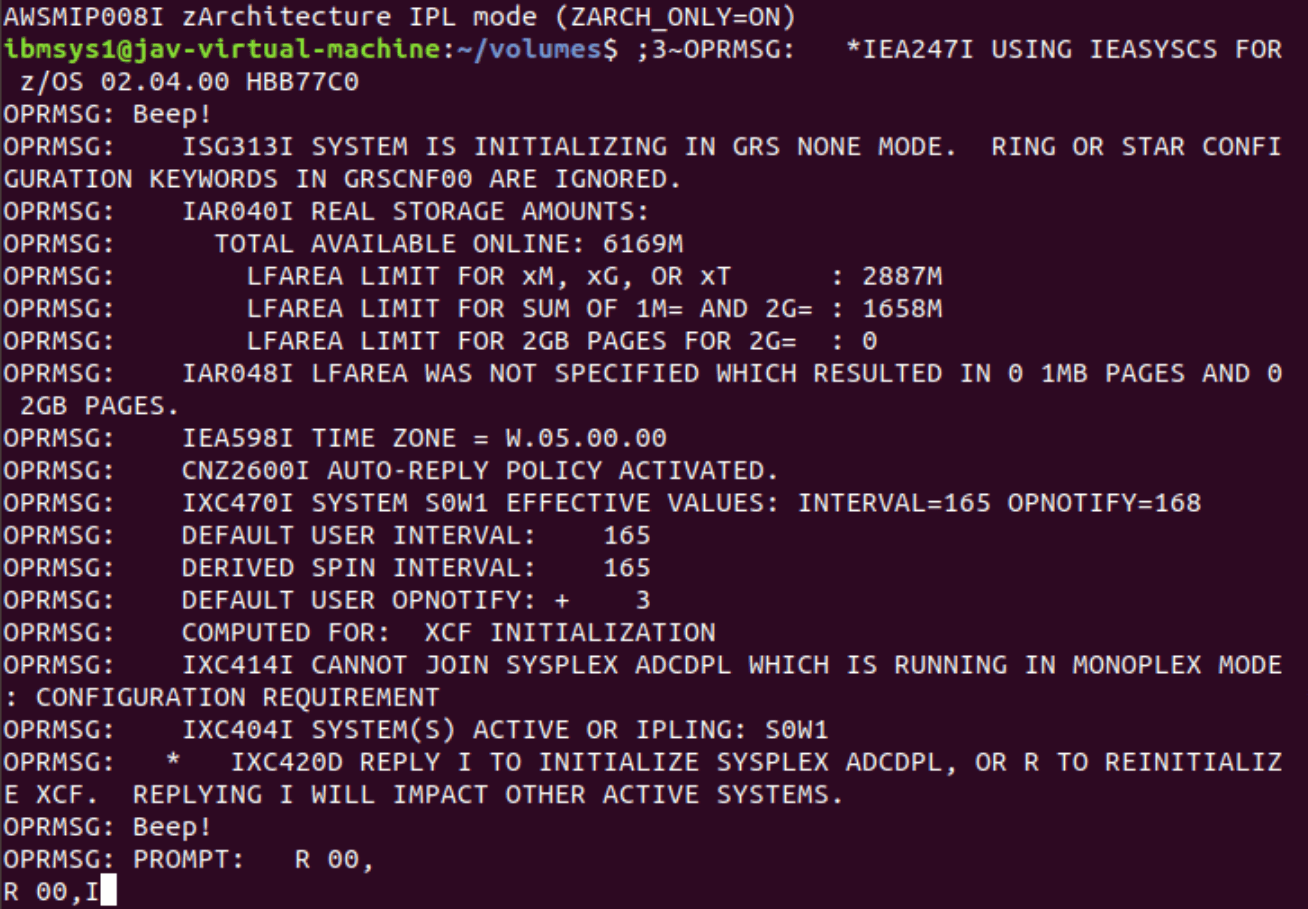
To respond we will put:
oprmsg 'R 00,I'
To activate the console, we connect a 3270 terminal with the system IP and port “3270”. We use the commands:
oprmsg 'v cn(\*),activate'
oprmsg 'v 700,console'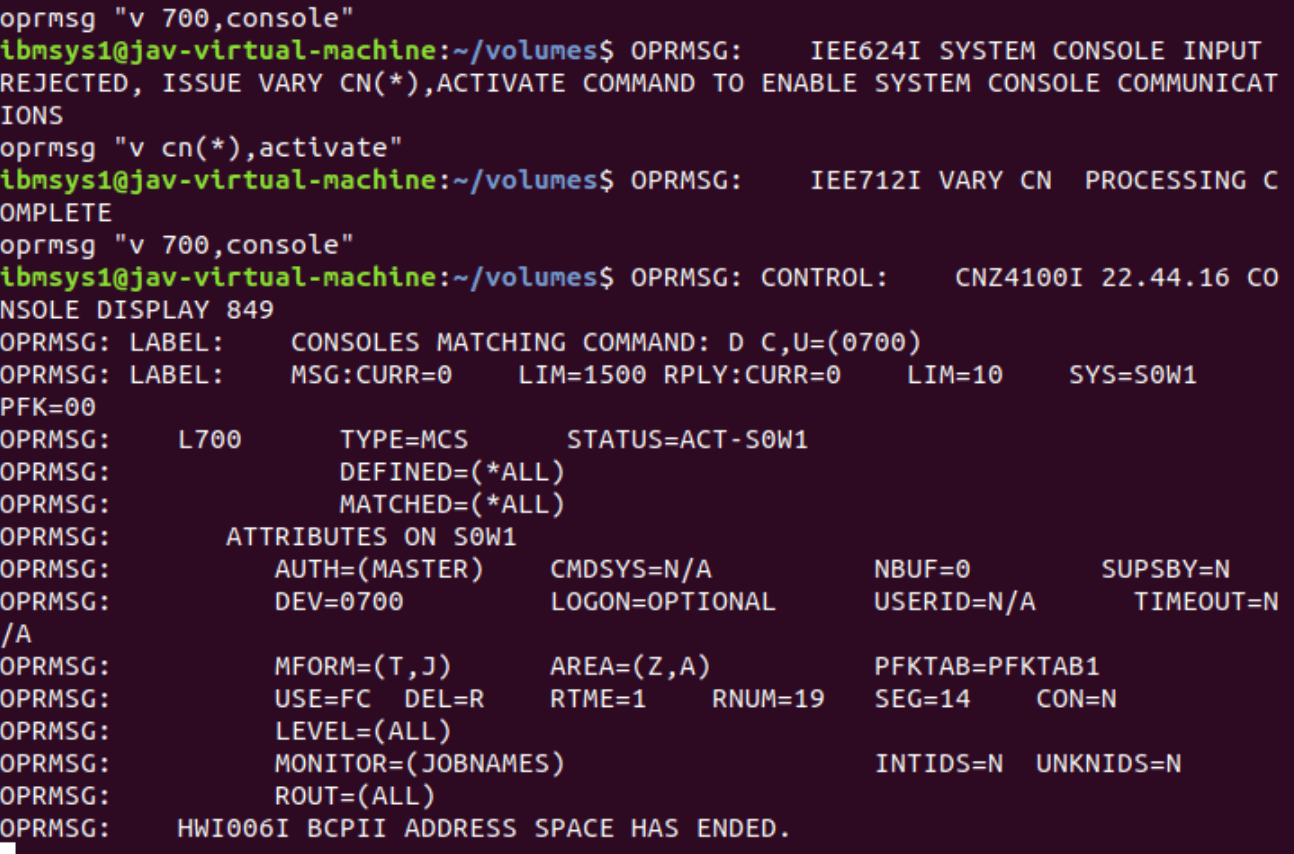
Fix ADCD Startup Error
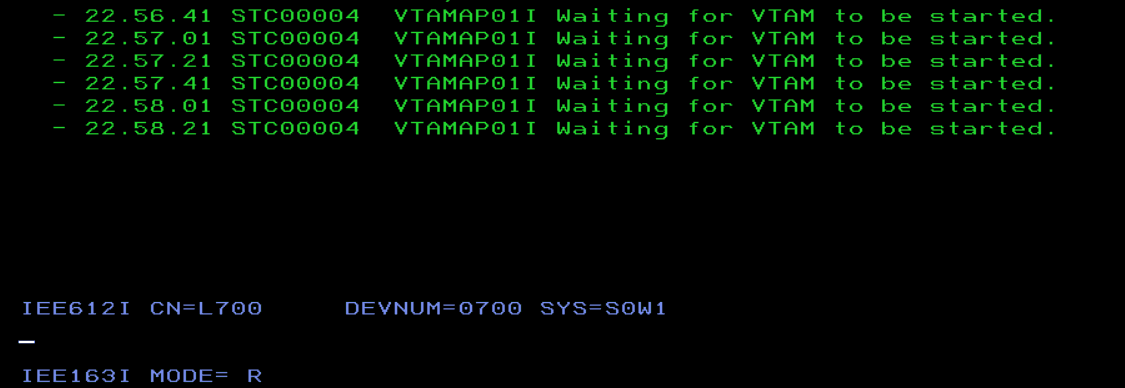
Surprisingly, this system won’t start! When VTAM tries to start it will say that there’s a module that’s not in an APF library.
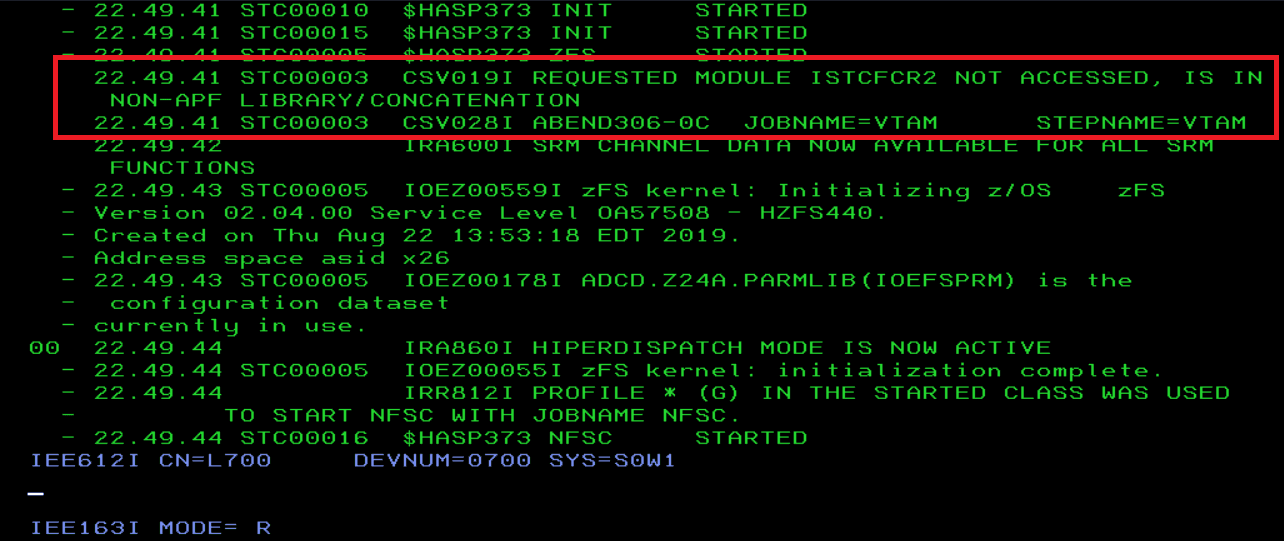
The startup will be stuck.
With the command D PROG,APF, we see the libraries that are authorized:
OPRMSG: LABEL: FORMAT=DYNAMIC
OPRMSG: LABEL: ENTRY VOLUME DSNAME
OPRMSG: 1 A4RES1 SYS1.LINKLIB
OPRMSG: 2 A4RES1 SYS1.SVCLIB
OPRMSG: 3 A4RES1 SYS1.SHASLNKE
OPRMSG: 4 A4RES1 SYS1.SIEAMIGE
OPRMSG: 5 A4RES1 SYS1.MIGLIB
OPRMSG: 6 A4RES1 SYS1.SERBLINK
OPRMSG: 7 A4RES1 SYS1.SIEALNKE
OPRMSG: 8 A4RES1 SYS1.CSSLIB
OPRMSG: 9 A4RES1 GIM.SGIMLMD0
OPRMSG: 10 A4RES1 SYS1.SHASMIG
OPRMSG: 11 A4RES2 CSF.SCSFMOD0
OPRMSG: 12 A4RES2 ISF.SISFLOAD
OPRMSG: 13 A4RES1 SYS1.SBDTCMD
OPRMSG: 14 A4RES1 SYS1.SBDTLIB
OPRMSG: 15 A4CFG1 USER.Z24A.LINKLIB
OPRMSG: 16 A4CFG1 FEU.Z24A.LINKLIB
OPRMSG: 17 A4SYS1 ADCD.Z24A.LINKLIB
OPRMSG: 18 A4CFG1 USER.Z24A.VTAMLIB
OPRMSG: 19 A4CFG1 FEU.Z24A.VTAMLIB
OPRMSG: 20 A4SYS1 ADCD.Z24A.VTAMLIB
OPRMSG: 21 A4RES1 FFST.SEPWMOD2
OPRMSG: 22 A4RES1 FFST.SEPWMOD4
OPRMSG: 23 A4RES2 NFS.NFSLIBE
OPRMSG: 24 A4RES1 TCPIP.SEZATCP
OPRMSG: 25 A4RES1 TCPIP.SEZALNK2
OPRMSG: 26 A4RES2 TCPIP.SEZADSIL
OPRMSG: 27 A4RES1 TCPIP.SEZALPA
OPRMSG: 28 A4RES1 TCPIP.SEZALOAD
OPRMSG: 29 A4RES1 ISP.SISPLOAD
OPRMSG: 30 A4RES1 SYS1.VTAMLIB
OPRMSG: 31 A4RES1 SYS1.SISTCLIB
OPRMSG: 32 A4RES2 CEE.SCEERUN
OPRMSG: 33 A4RES2 CEE.SCEERUN2
OPRMSG: 34 A4RES1 CBC.SCLBDLL
OPRMSG: 35 A4RES1 CBC.SCLBDLL2
OPRMSG: 36 A4PRD2 IGY630.SIGYCOMP
OPRMSG: 37 A4PRD1 EQAE10.SEQABMOD
OPRMSG: 38 A4PRD1 EQAE10.SEQAAUTH
OPRMSG: 39 A4PRD1 FAN140.SEAGLPA
OPRMSG: 40 A4PRD1 DIT130.SDITMOD1
OPRMSG: 41 A4PRD1 FELE10.SFEKAUTH
OPRMSG: 42 A4PRD1 FELE10.SFELLPA
OPRMSG: 43 A4PRD1 FEUC04.SFEUAUTH
OPRMSG: 44 A4PRD2 CSQ911.SCSQLINK
OPRMSG: 45 A4PRD2 CSQ911.SCSQAUTH
OPRMSG: 46 A4PRD2 CSQ911.CSQ9.SCSQAUTH
OPRMSG: 47 A4PRD2 CSQ911.SCSQSNLE
OPRMSG: 48 A4PRD2 CSQ911.SCSQANLE
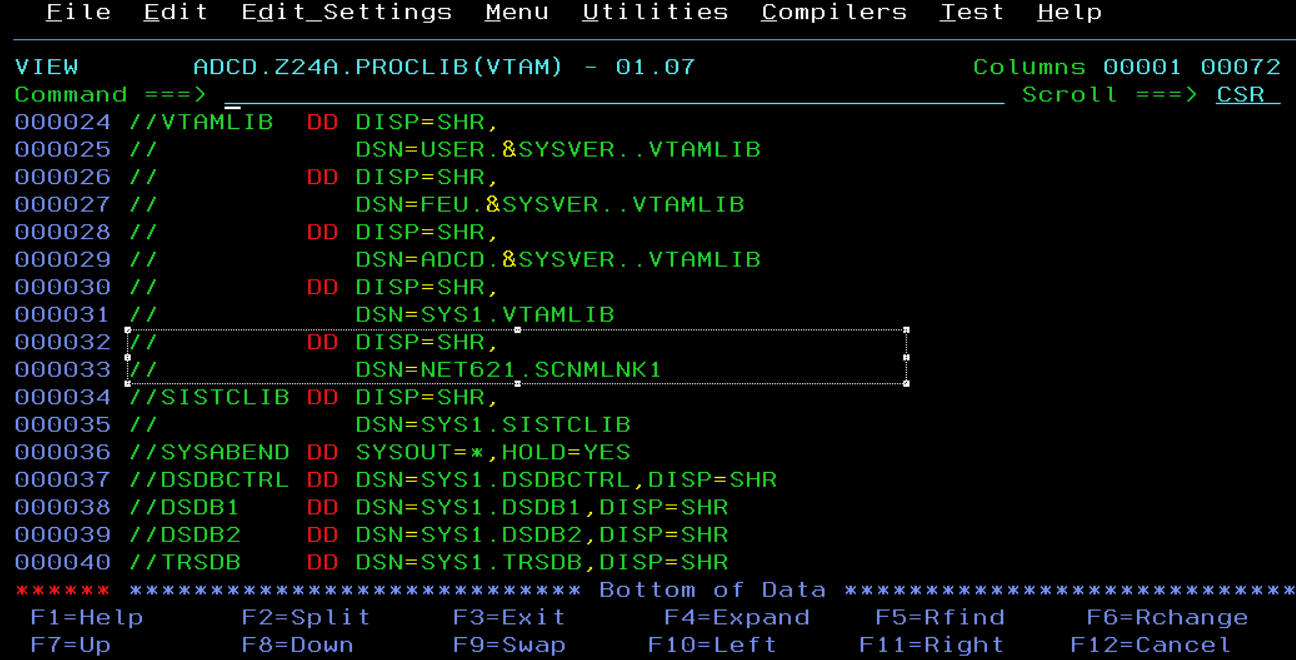
OPRMSG: 49 A4PRD2 CSQ911.SCSQMVR1The problem with this startup is that the VTAM task has the dataset NET621.SCNMLNK1 in the VTAMLIB DD, but this dataset is not APF authorized, making none of that concatenation APF authorized.
To resolve it and have the system start, we add the dataset to the APF list dynamically.
SETPROG APF,ADD,DSNAME=NET621.SCNMLNK1,VOLUME=A4PRD3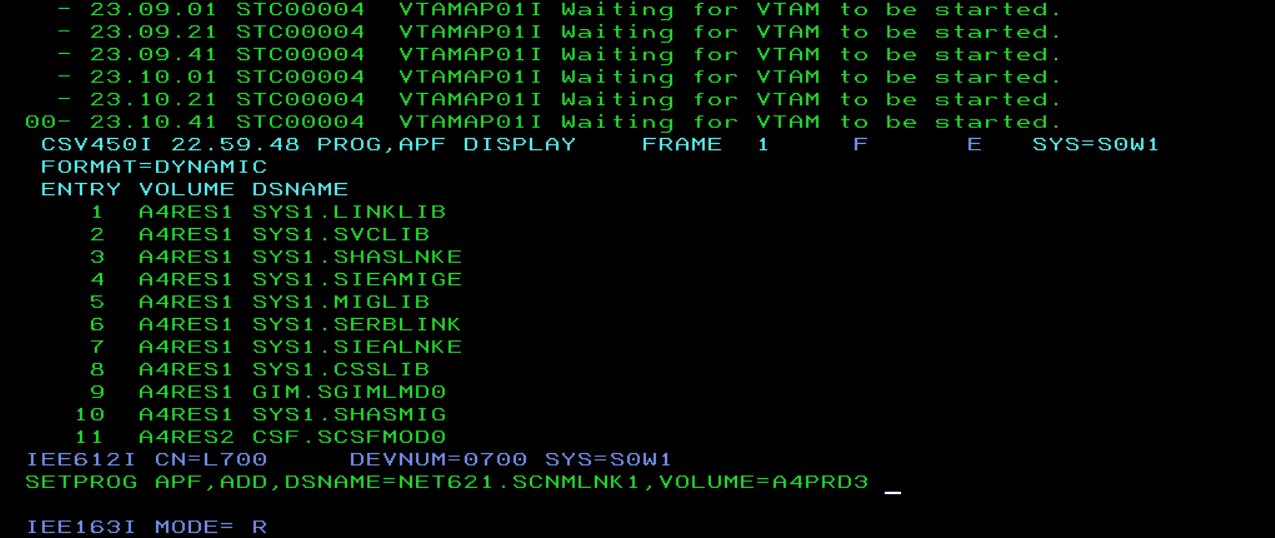
Now we can start VTAM. Command:
S VTAM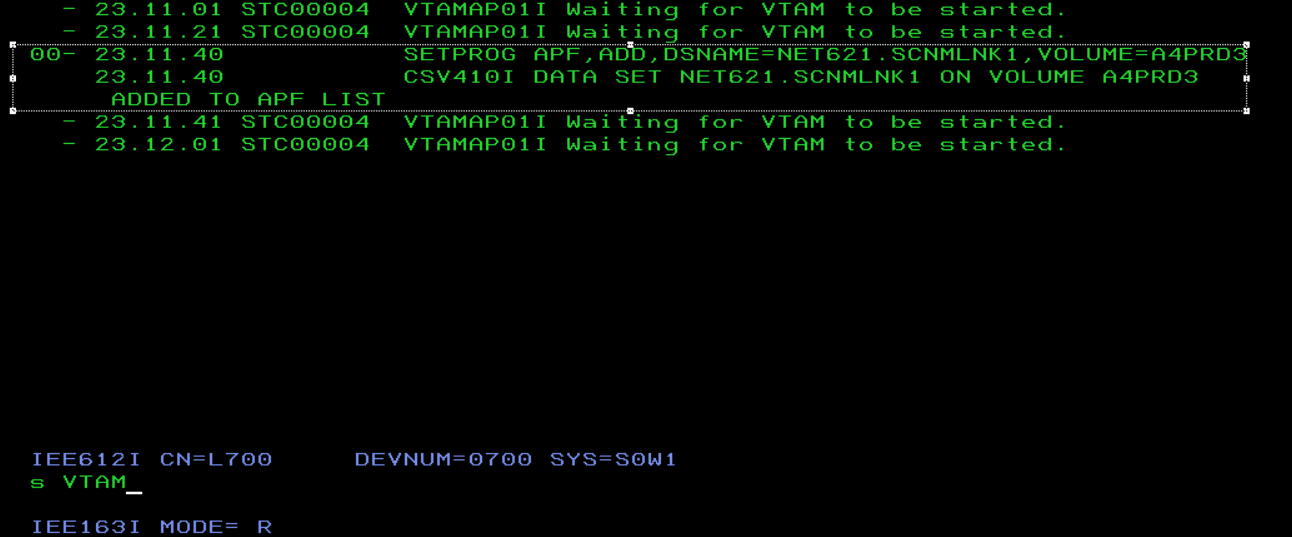
Now it will start correctly.
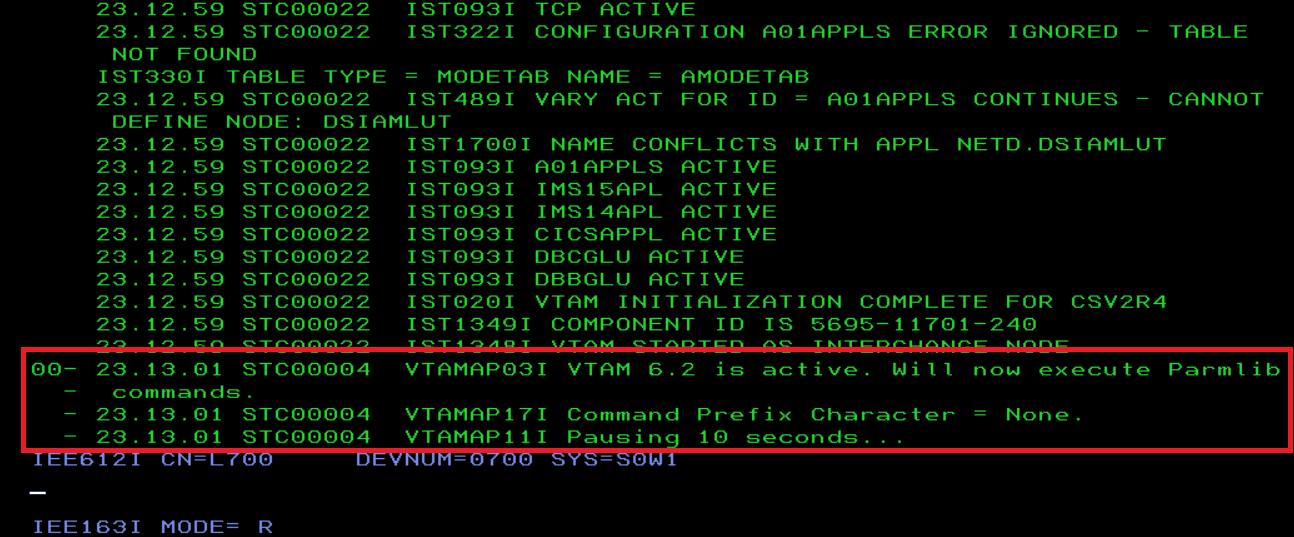
We wait for everything to start.
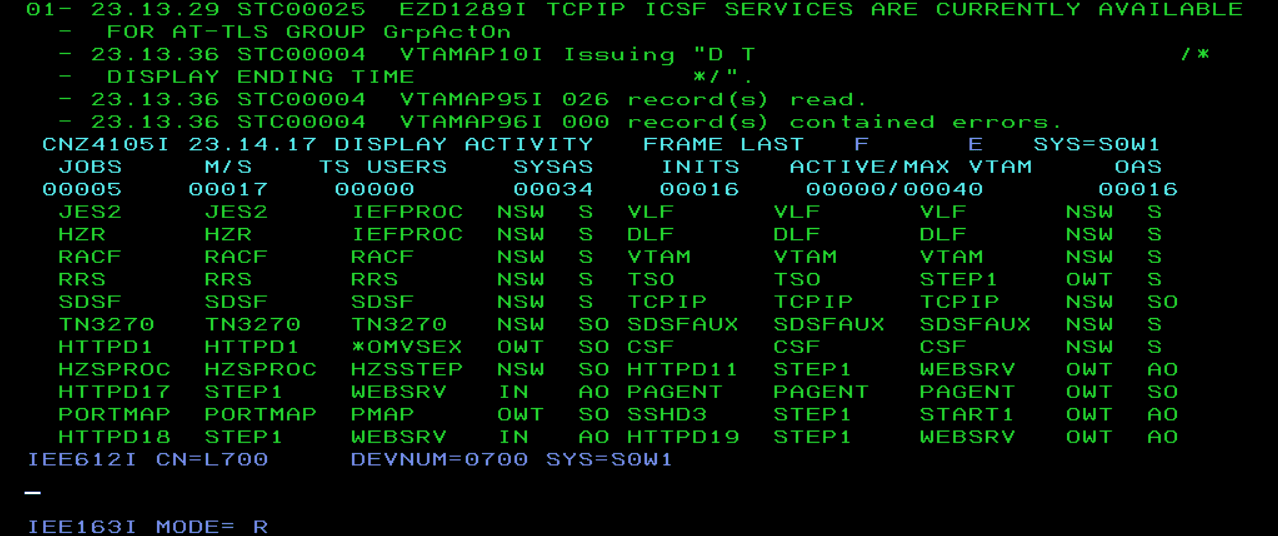
We will now be able to access the system.
Now we take the opportunity to fix the error in the corresponding library.
We confirm that the library NET621.SCNMLNK1 is in the concatenation of the VTAMLIB DD.
To find out which PROGxx member we should add the dataset to, we can do the following:
Check the LOADCS member (because we started with the CS loadparm) and look at the SYSPARM parameter, which references the IEASYS member, in this case, IEASYSCS.
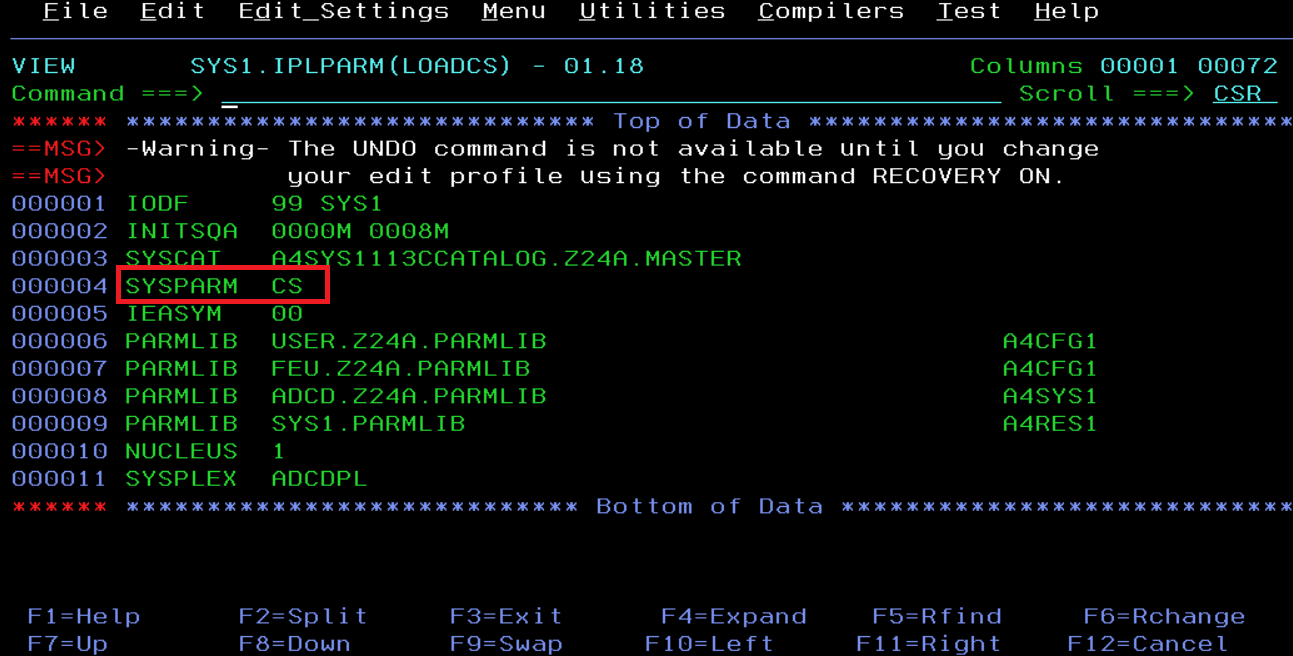
Check the PROG parameter of the IEASYSCS member.
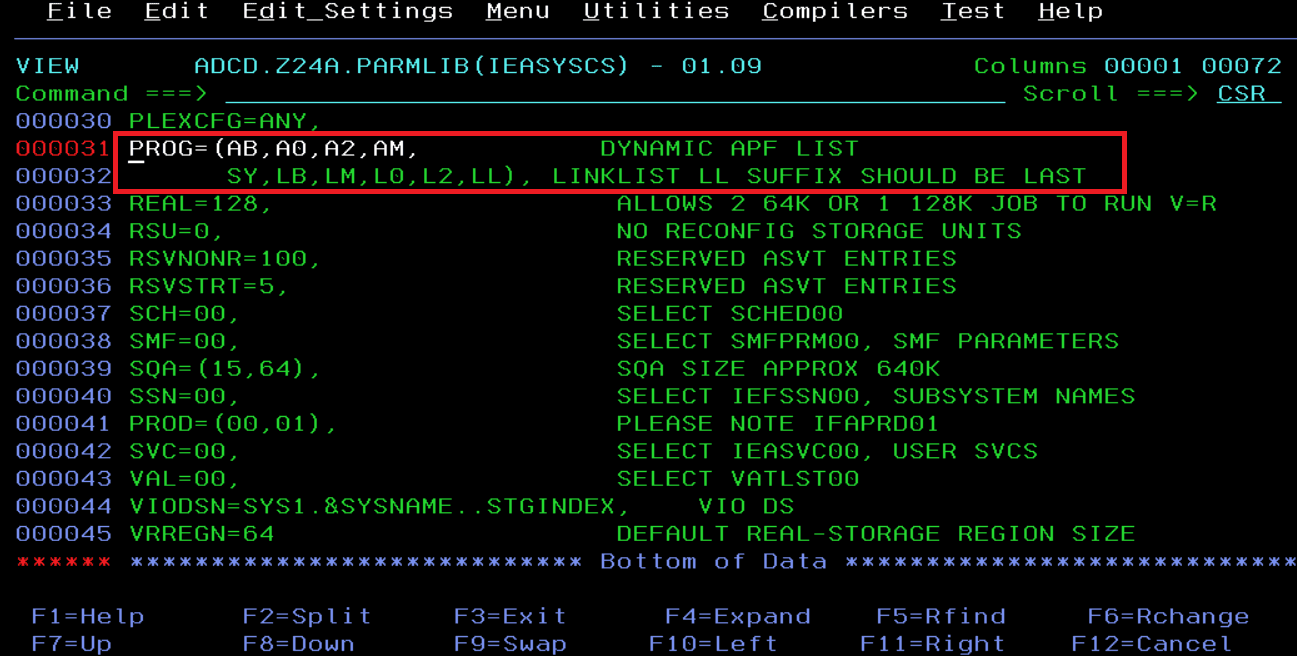
Add the library to the PROGAB member. It’s now defined for future IPLs.

Stopping the System and Emulator
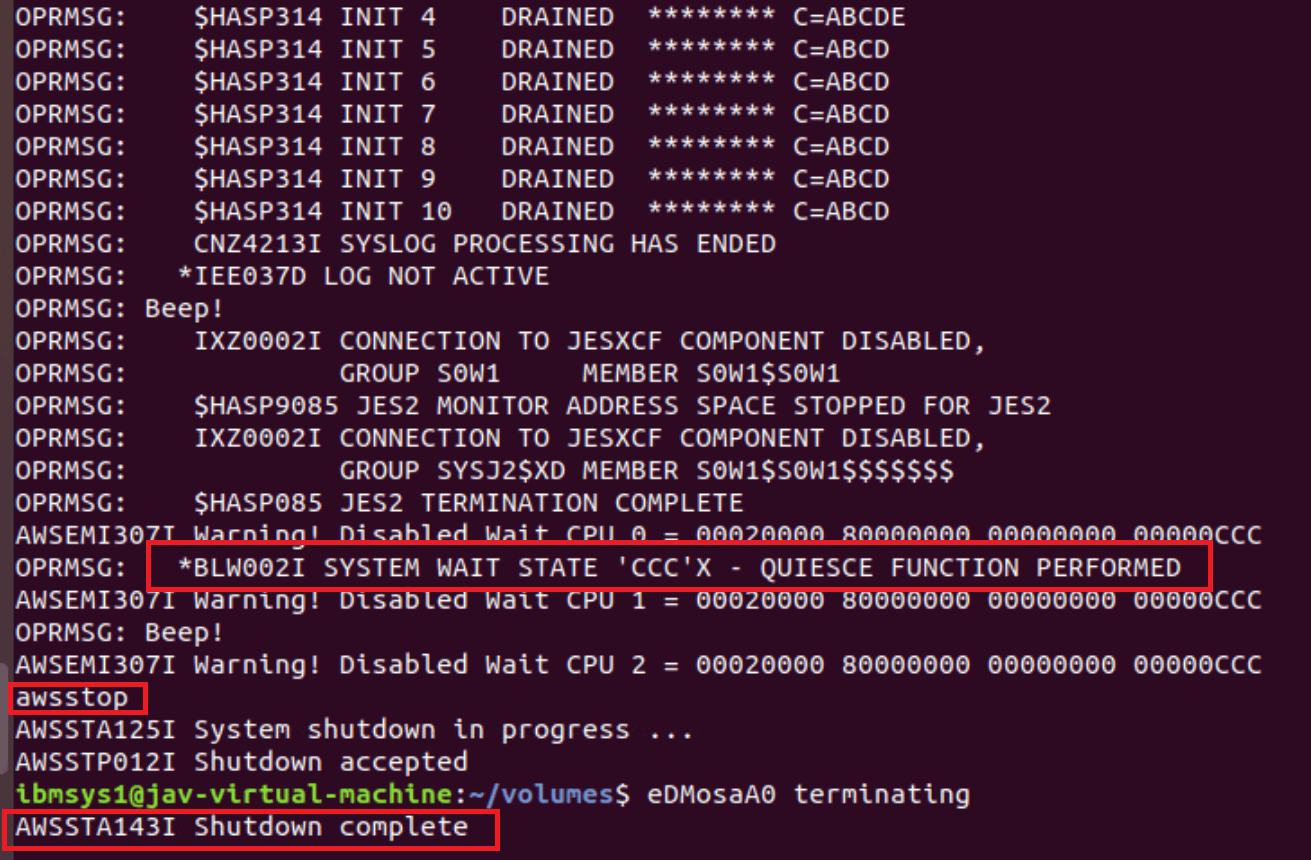
To stop the emulator, we will use the shutdown commands that exist in these systems (the fact that they exist here doesn’t mean they’re on other “real” systems).
In my case, since I started with LOADPARM “CS”, I will stop with the command S SHUTDOWN.
Another command that works to stop is S SHUTALL.
There are more available, but I mainly use those two.
Once everything has stopped, after the $PJES2 command, we will issue the QUIESCE command on the z/OS console.
It’s a way to stop the processors.
Then in the emulator terminal (on Ubuntu), we will issue the awsstop command to stop the emulator.
Install x3270 Terminal
Optionally, we can install the x3270 terminal and configure the emulator startup to have the console in this terminal.
To install x3270:
apt-get install x3270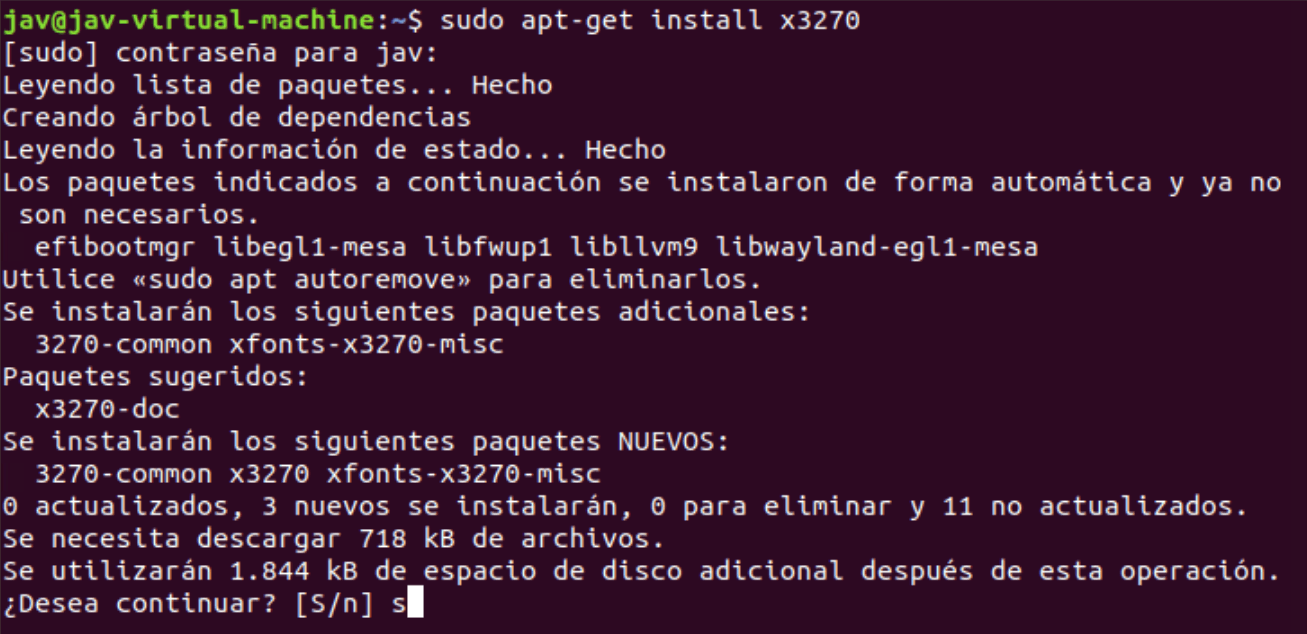
Then, add this command to the Devmap file:
command 2 x3270 -model 3 localhost:3270NOTE “model 3” is a 32-line terminal and “model 4” is 43. We should use the port we have configured.
This way, when we start the emulator, it will start the terminal and we will have the console.
